Check that a printer or card reader works with your device before you buy it.
Sign up
Open the app and choose Sign up.
Enter your store name and email, then create a password.
Read the terms before you agree to them.
Enter the code sent to your email.
Follow the welcome steps to set up your store.
If the code does not arrive, check your junk mail. Use the resend option if needed. Ask Support for help if you still cannot sign up.
If you see a Google or Apple sign-up button, you can follow that sign-up path instead.
Login
Open the app and choose Login.
Enter the email and password for your store.
Complete any sign-in checks shown in the app.
Use your Google or Apple sign-in button if that is how you set up your account. Your store login is not the same as a customer's shop login.
General Layout
Open the main menu to choose a page.
Inventory holds the items you sell.
Sell is where you build a sale and take payment.
Transactions shows saved sales and refunds.
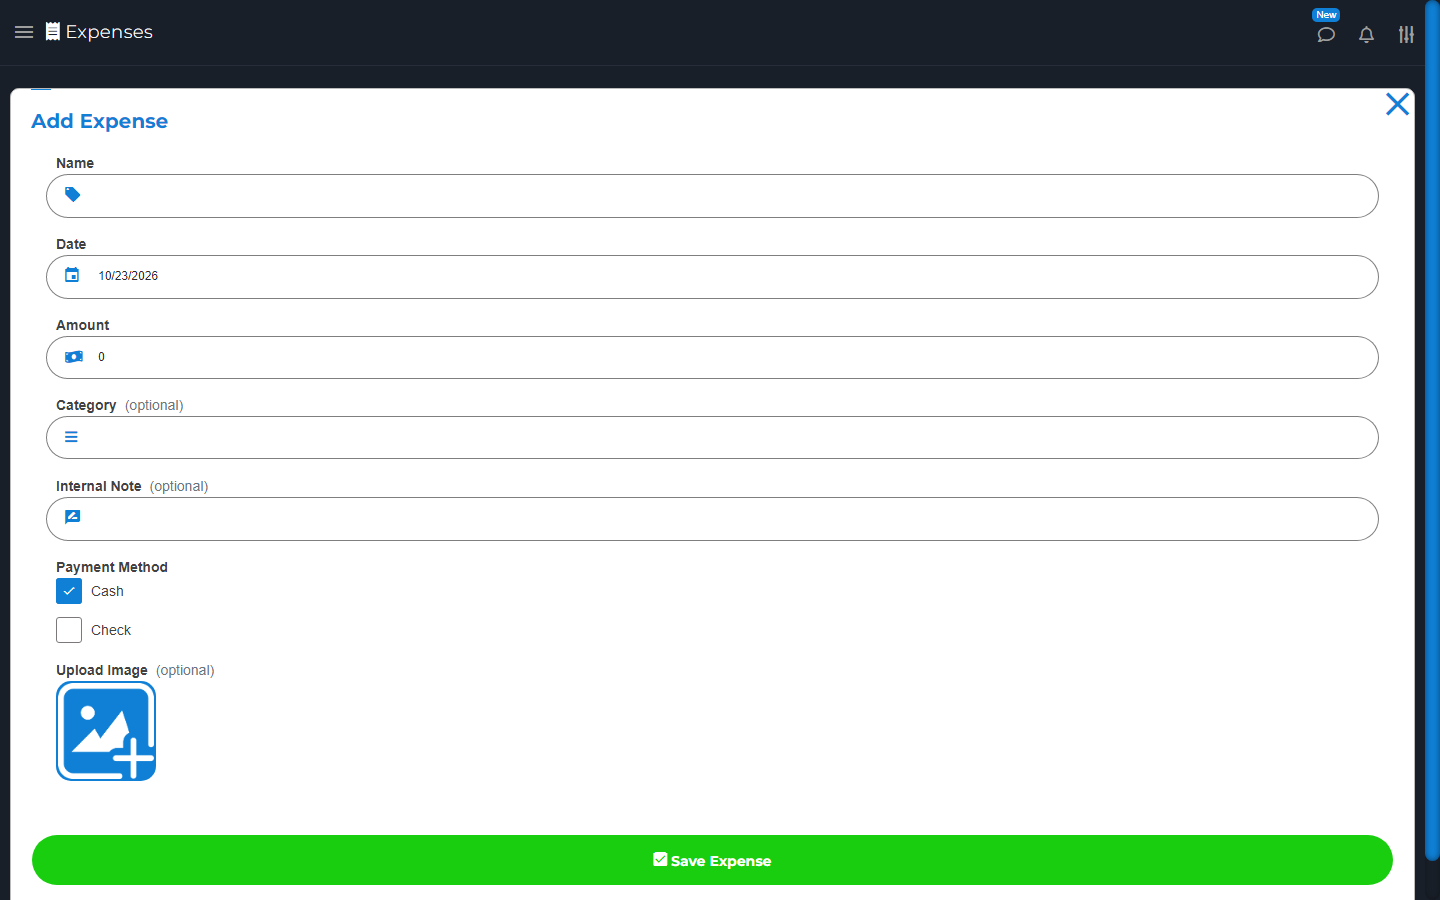
Expenses holds the costs you record for your store.
Online Store controls the shop your customers use on the web.
Open the main menu to choose a page.
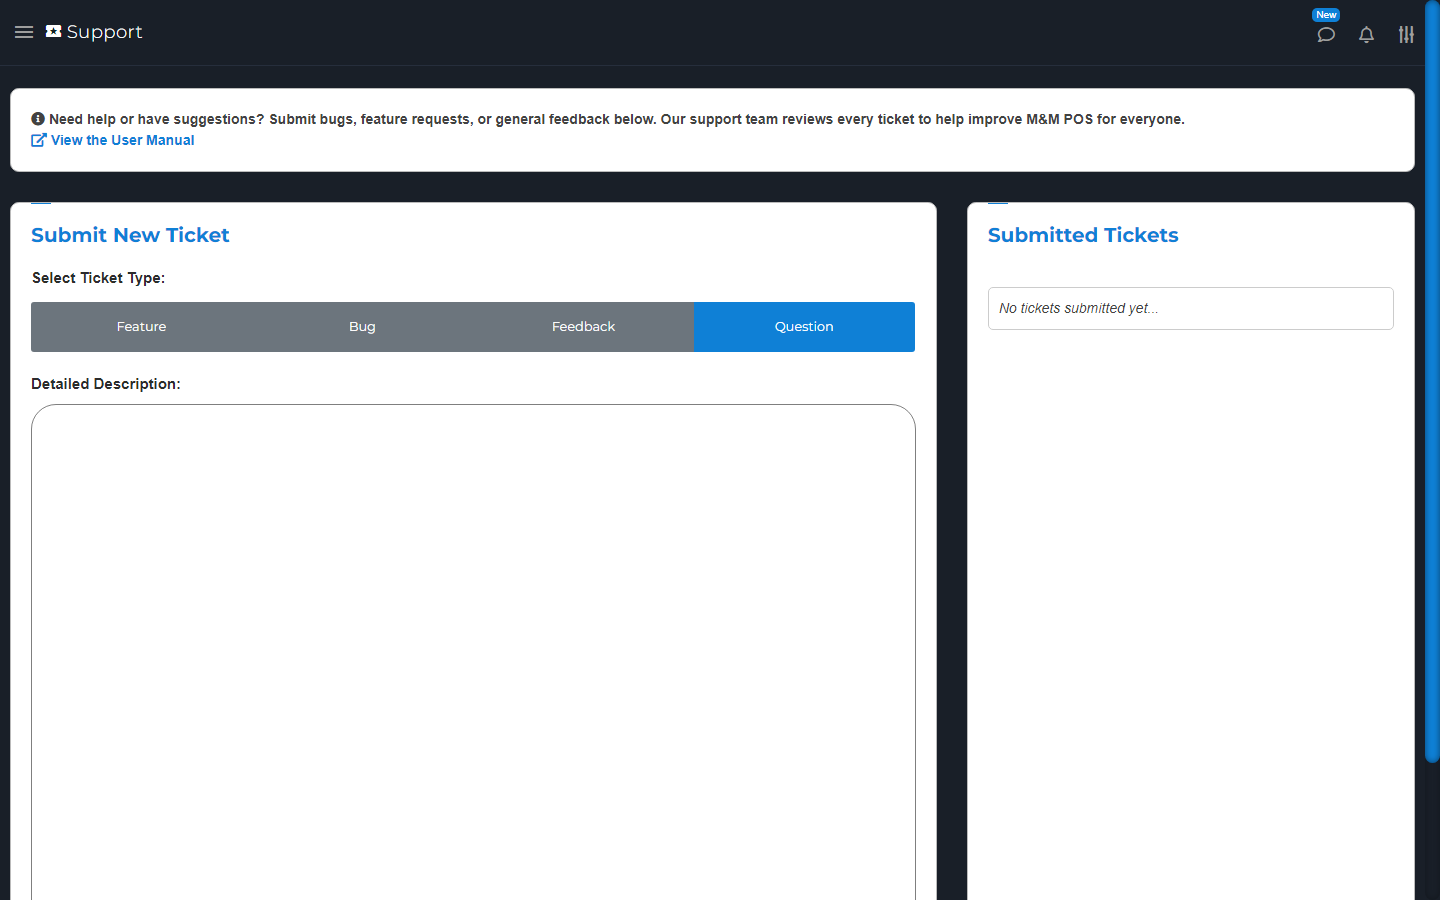
Choose your store name to find Settings and Support. Pages for add-on tools appear when the add-on is enabled. Staff may see fewer pages based on the access you give them.
A three-dot button opens more choices. In this guide, “choose” means tap on a phone or click on a computer.
Keypads and alerts
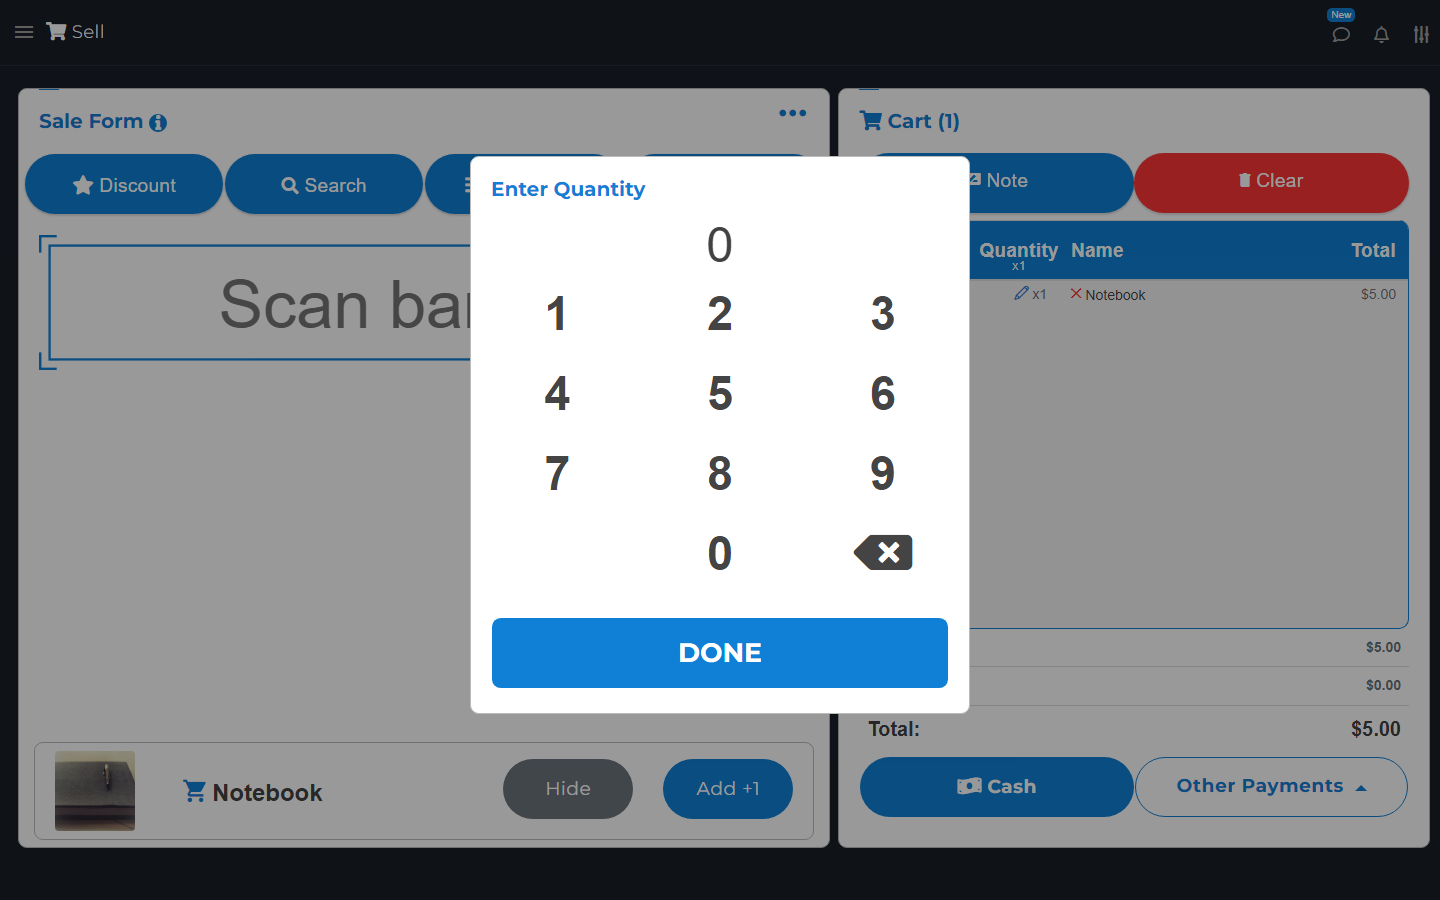
Use the number keypad when the app asks for an amount. Check the number, then choose DONE.
The alert icon shows app notices. Open an alert to read it and check the linked record. An alert about an order is not proof that its payment is complete.
Use the card or table view controls to change how a list looks. These do not change the saved data.
Common words in this guide
Inventory: your list of items and stock.
Stock: how many items you have.
Transaction: a saved sale or refund.
Invoice: a bill asking a customer to pay.
Estimate: a price quote before the customer agrees.
Subscription: a payment that repeats.
Modifier: a choice added to an item.
Variation: a product choice, such as size or color.
Checkout type: how the buyer gets the order, such as Pickup, Delivery, or Shipping.
Customer Portal: a web page where a customer sees their own records.
Permission: what someone is allowed to do.
The guide keeps button names as they appear in the app. Use this list whenever you need a quick explanation.
Reset Password
On the login screen, choose Reset Password.
Enter your store email and choose Reset.
Get the code from your email and enter it.
Enter your new password and finish the reset.
Check junk mail if you do not see the code. Do not share your code or password. Use Device Management to sign out a device you no longer trust. Do not rely on a password reset to sign out all devices.
Sign Out
Open the menu and choose your store name. Choose Sign Out. You can also use Sign Out Of Store in Settings.
Finish any open sale first. On a shared device, sign out when you no longer need access.
Get started
Pricing
See what is free, what costs extra, and how each payment plan works.
The core M&M POS app is free. Download it, create your store, and use the basic tools without buying an add-on.
Free app: no monthly fee for the core tools.
Stripe payments: a 1% M&M POS app fee on successful Stripe payments, plus Stripe's fees.
Optional paid add-ons: buy only the extra tools you need.
The Add-on badge marks an extra tool you can enable for your store.
What is free?
The core app includes your normal item list, basic stock tools, sales records, expense records, tax and fee settings, and the basic online shop.
Stripe connection and its supported payment tools do not require a paid add-on, but payment fees still apply. Tools such as detailed reports, Customer Management, bookings, and coupons are optional add-ons.
Use your store on its supported devices. A paid add-on is for one store, across that store's users and devices. Separate stores need their own add-ons.
Stripe payment fees
For a successful Stripe payment processed through M&M POS, the standard M&M POS app fee is 1% of the payment amount. Stripe charges its own processing fee as well. These fees are deducted through Stripe; the app fee is not a separate monthly subscription.
For example, the M&M POS app fee on a $100 payment is $1. Stripe's processing fee is added to that cost. There is no single combined rate for every payment: the country, card, payment method, and Stripe account can change it. Check Stripe's current pricing for your country.
The 1% app fee does not apply to cash or payments processed outside this Stripe integration. An outside payment provider can still charge its own fees.
Extra Stripe services can have their own fees too. For example, check Stripe Billing pricing if you use recurring billing. Your Stripe account's terms show which charges apply.
These payment fees are not the same as a fee you choose to charge a buyer. See Fees Management for store-added fees.
Add-ons and plans
Add-ons are extra tools you can choose for your store. The app offers monthly, yearly, and one-time payment options. Check the details in Add-ons before choosing a plan.
A plan is for one add-on and one store. A one-time plan does not remove Stripe payment fees or include every other add-on.
The app also offers Invoice and Misc Item tools through their Stripe Features settings. Check those settings before choosing a separate add-on.
Find add-ons in the app
Open Add-ons in M&M POS to see the extra tools. Open a tool to read what it does and what it needs.
Choose the tools that fit your store. See Add-ons for trials, purchases, and plan management.
Trials, renewals, and cancellation
Use Start Trial when an add-on offers it. Check the trial length and end date shown before starting. The trial end date shows when that access ends.
Manage repeating add-on payments in Settings > My Add-Ons. Cancel a subscription to stop its next renewal. You keep access through the time you have paid for. Disable Add-On only hides the tool; it does not cancel billing.
Use Update Payment Method to change the card for add-ons, and Billing History to review payments. These add-on bills are separate from Subscriptions Management.
Questions about your setup?
Need help choosing equipment or a plan for your store? Contact our team and tell us what you want to do. We would be happy to help you find a suitable setup.
Read the trial length and any rules. Confirm to start.
Use the tool, then check its end date in Settings > My Add-Ons.
Check the end date so you can decide whether to keep using the add-on. Contact Support if you need help with your trial.
Buying Add-ons
Open the add-on and choose the purchase option you want.
Add it to the cart.
Check the store, tools, price, and payment plan.
Finish payment on the checkout page.
Return to the app. Check My Add-Ons to make sure it is ready.
An open checkout page does not mean you paid. Check the result before you try to pay again.
Add-on Subscriptions
A subscription is a payment that repeats, such as each month or year.
Open Settings > My Add-Ons. Find the tool to view its plan and next payment. Use Cancel Subscription to stop the next renewal. You keep access through the time you have paid for.
Disable Add-On hides a tool. It is not the same as canceling its payment plan. Use Update Payment Method to change the card used for add-ons. Billing History shows past payments and receipts.
These plans pay for your store's add-ons. Use Subscriptions Management for recurring payments from your customers.
Tools and offers shown in the app
The Coming Soon list shows planned tools that are not yet available. You can use Upvote to show interest when offered.
If the app shows a special offer or reward, read its current terms before taking part. Do not rely on an old price, code, or screenshot. Related add-ons are suggestions, not always required tools.
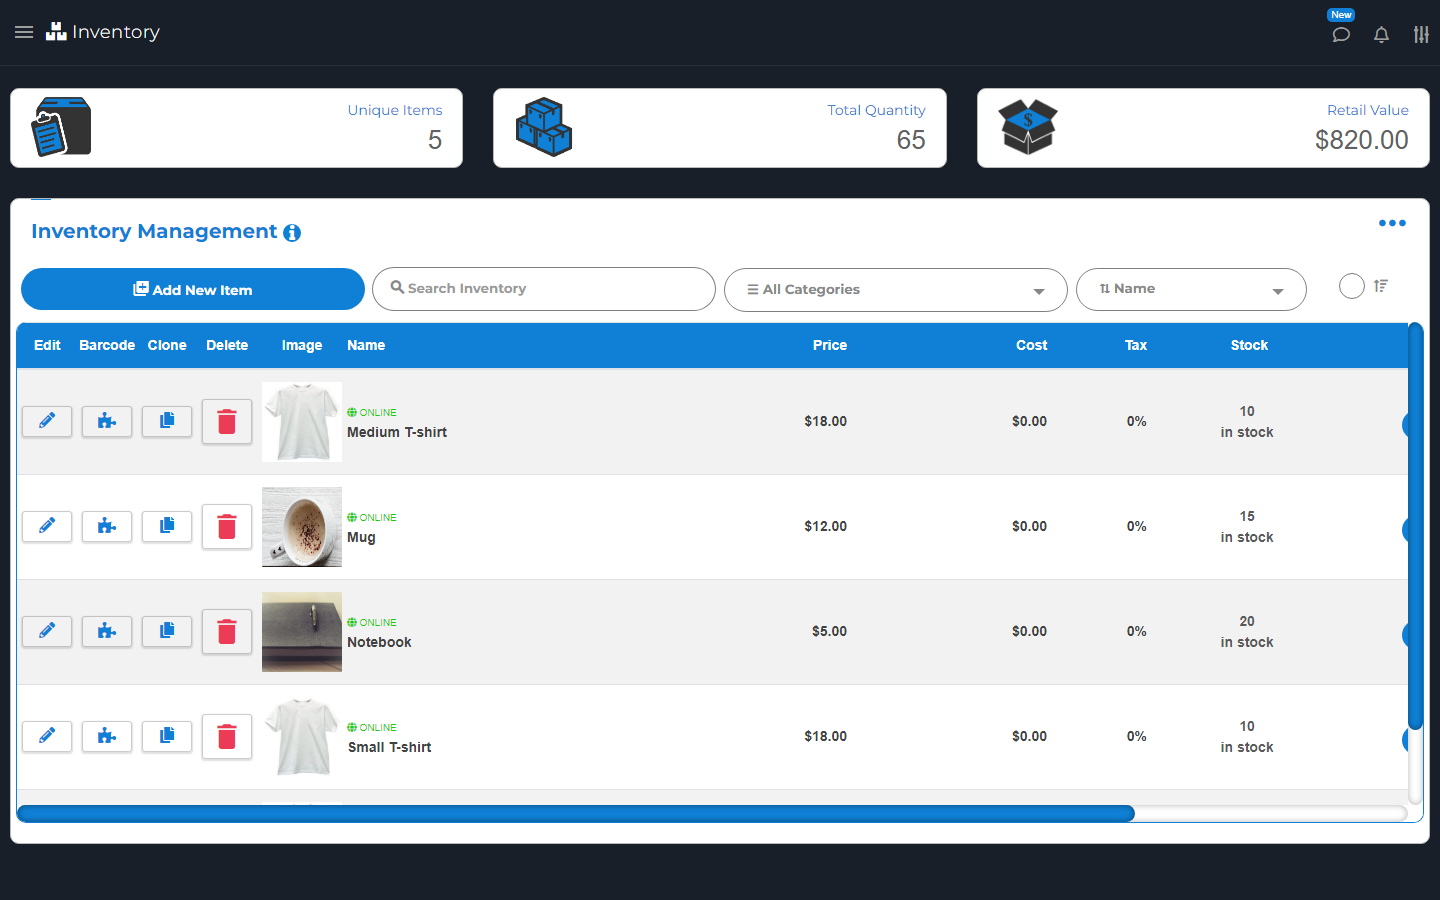
Inventory is the list of items you sell. Open an item to see or change its price, stock, and other details.
The item list shows product photos, prices, and stock counts. T-shirt photo: GlennD09. Mug photo: Ryan Adams (cropped). Both CC BY 2.0. Notebook photo: Thomas Martinsen, CC0.
Unique Items counts item records. Total Quantity is the stock count. Retail Value is the value at your sale prices. It is not money you have already earned.
Use Inventory Stats for more totals, such as cost value and online item counts. Use the menu to switch the list view or find more tools.
Adding Items
Open Inventory > Add New Item.
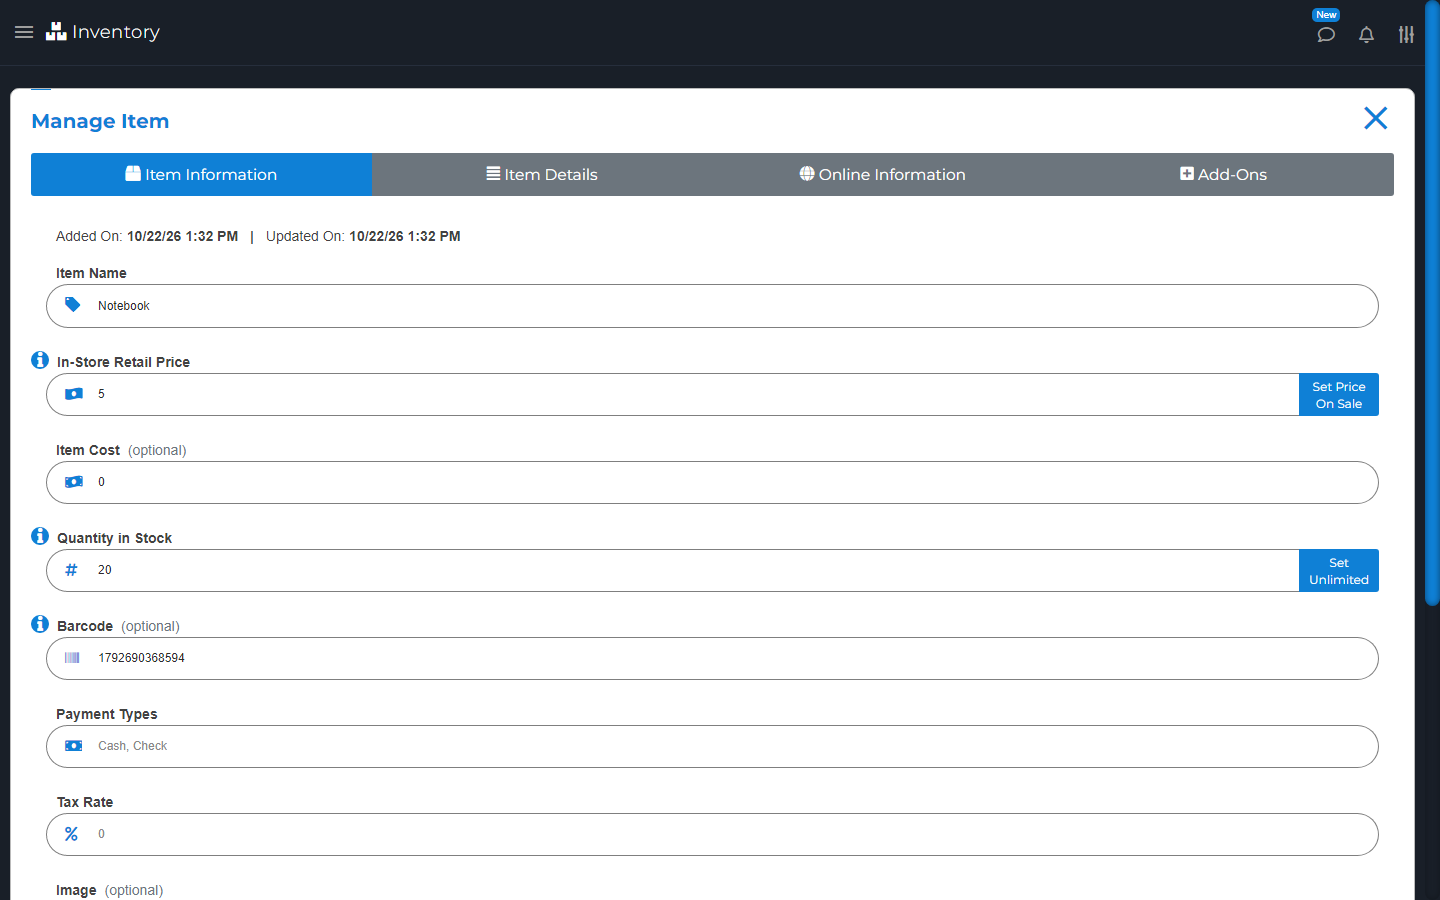
Enter Item Name and Retail Price. The retail price is what the buyer pays for the item before any extra charges.
Enter Item Cost if you want cost and profit reports. This is what the item costs you.
Set Quantity in Stock. Use Unlimited only if you do not need a real count.
Barcode is optional. If the item has one, scan or enter it. Otherwise leave it blank; M&M POS fills in a code when you save. Do not reuse another item's barcode.
Set the item's payment types and tax rate. Check both before you sell it.
Add a category, subcategory, note, or picture if needed.
Choose Save. Check that the item is in your list.
Set Price On Sale lets staff enter the price when they sell it. A category groups items, such as Drinks. A subcategory is a smaller group, such as Juice. For online items, keep notes free of private details. Some online views can use the item description when online text is missing.
Set the item name, price, and stock count here.
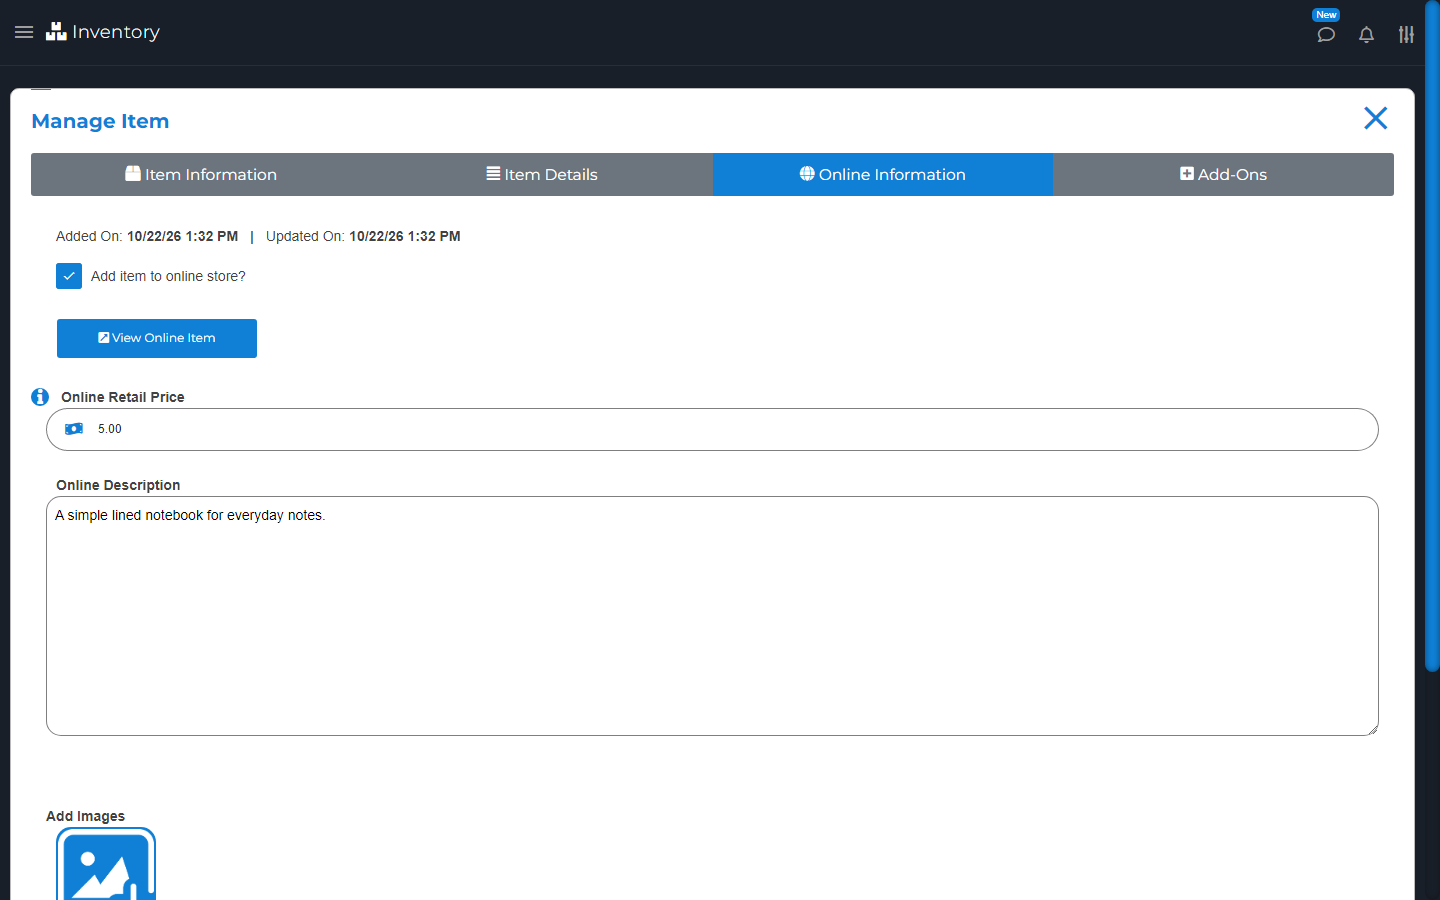
Use the Online tab for the online price, public text, and photos. See Products & Inventory.
Editing Items
Open Inventory, find the item, and choose Edit. Change the fields you need and choose Save.
Check the saved price and stock. The online price can differ from the in-store price, so check the Online tab too. Use Save & add new item or Save & clone item only if you also want to start another item.
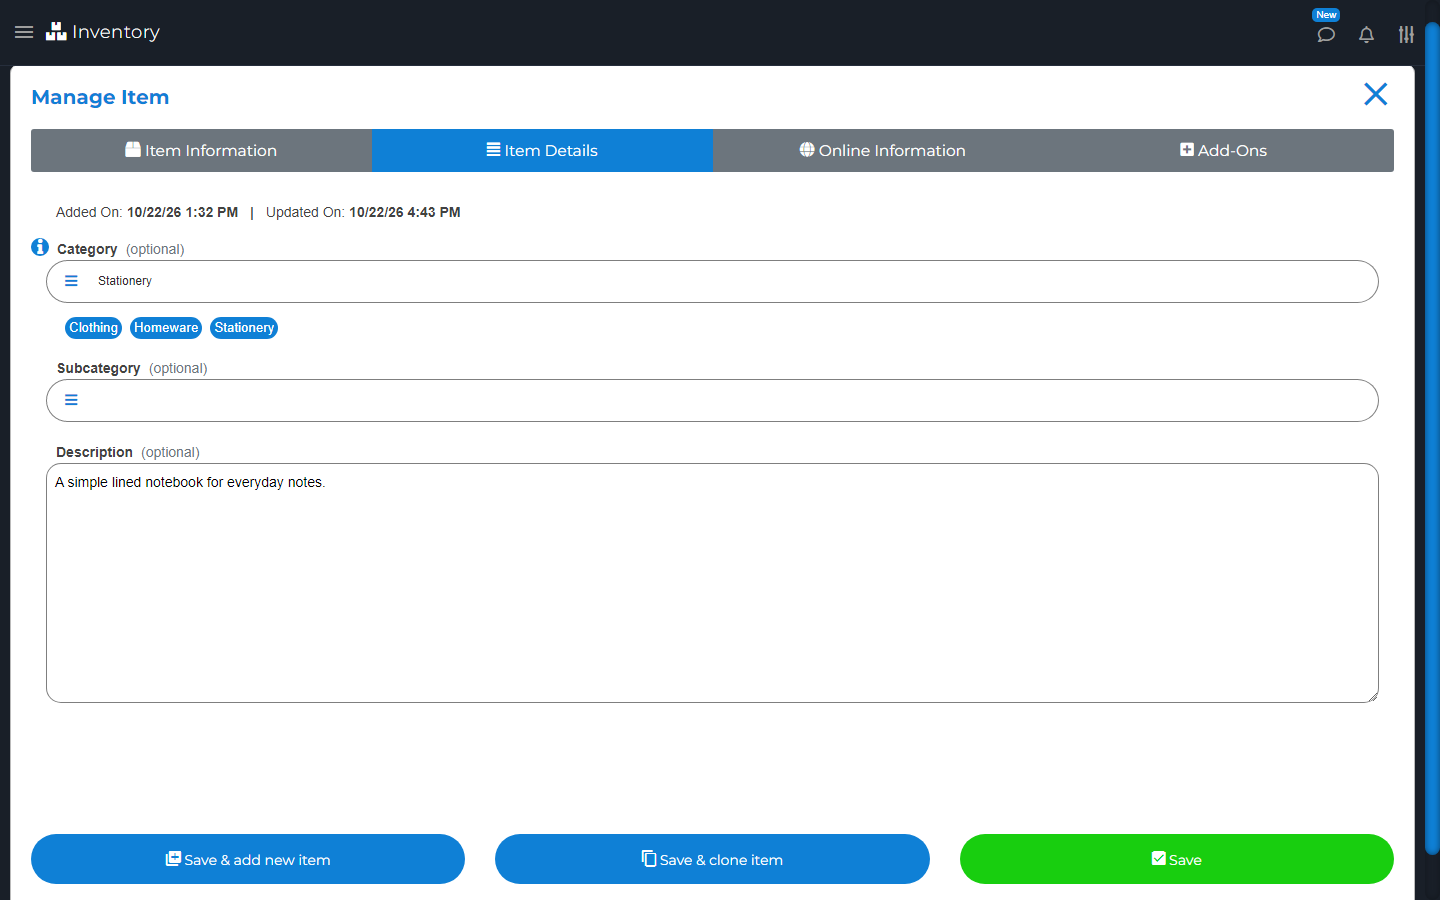
Use Item Details to set the category and add a clear item description.
Cloning Items
Clone makes a copy so you do not have to enter the same details again.
Find the item and choose Clone. Change the name, barcode, price, and stock as needed. Check the online fields too. Save the new item. Each item must have its own barcode.
Searching Inventory
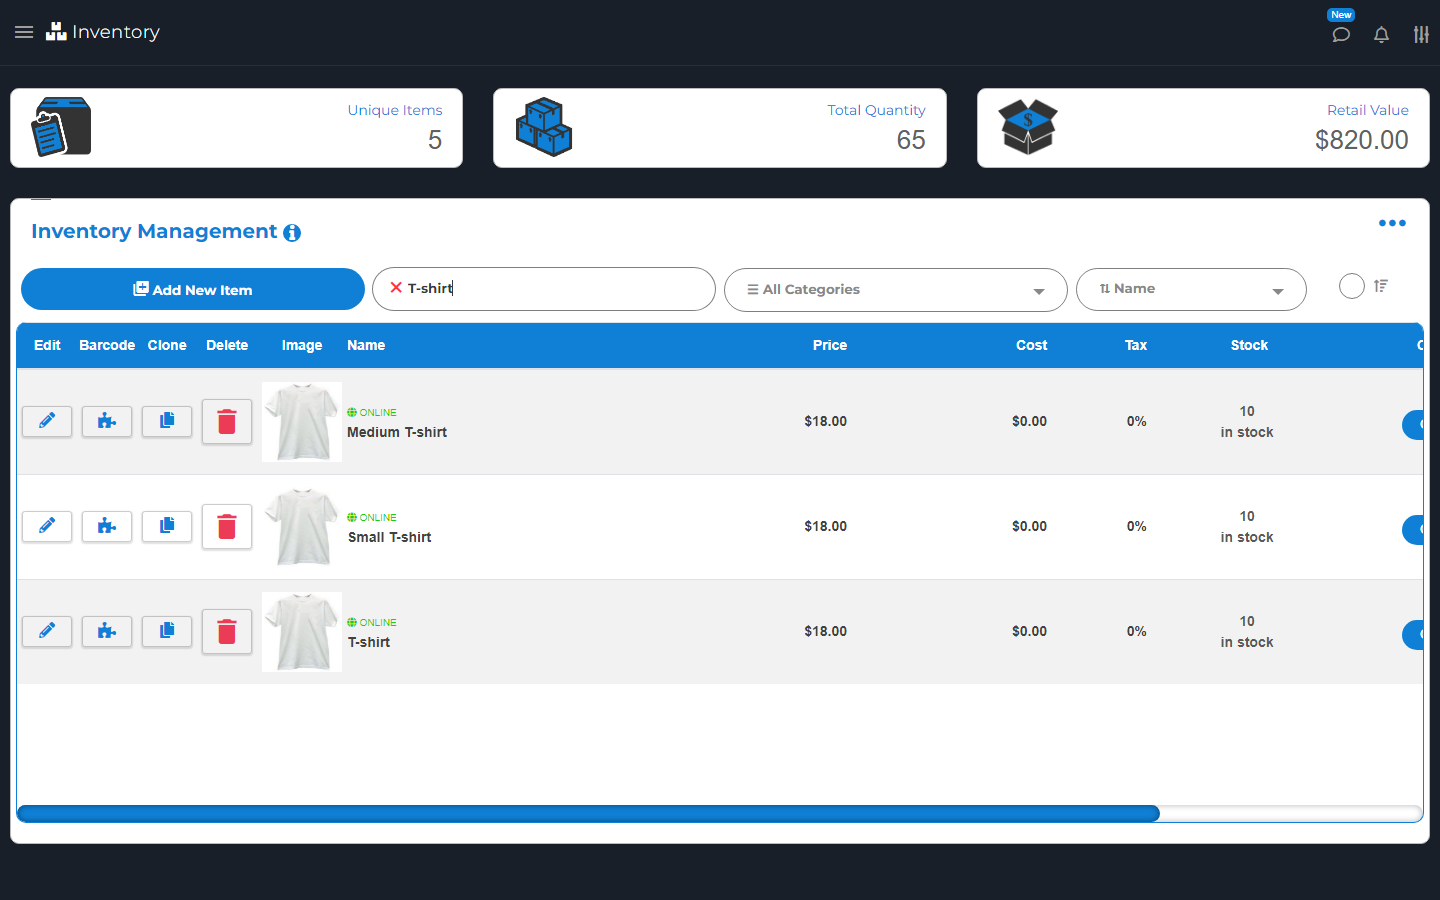
Use Search Inventory. Enter a name, barcode, note, or category, then run the search. You can also scan a barcode.
Clear the search to see the list again. If you still cannot find an item, check that a category filter is not hiding it.
Type part of an item name to narrow the inventory list. T-shirt photo: GlennD09, CC BY 2.0.
Sorting Items
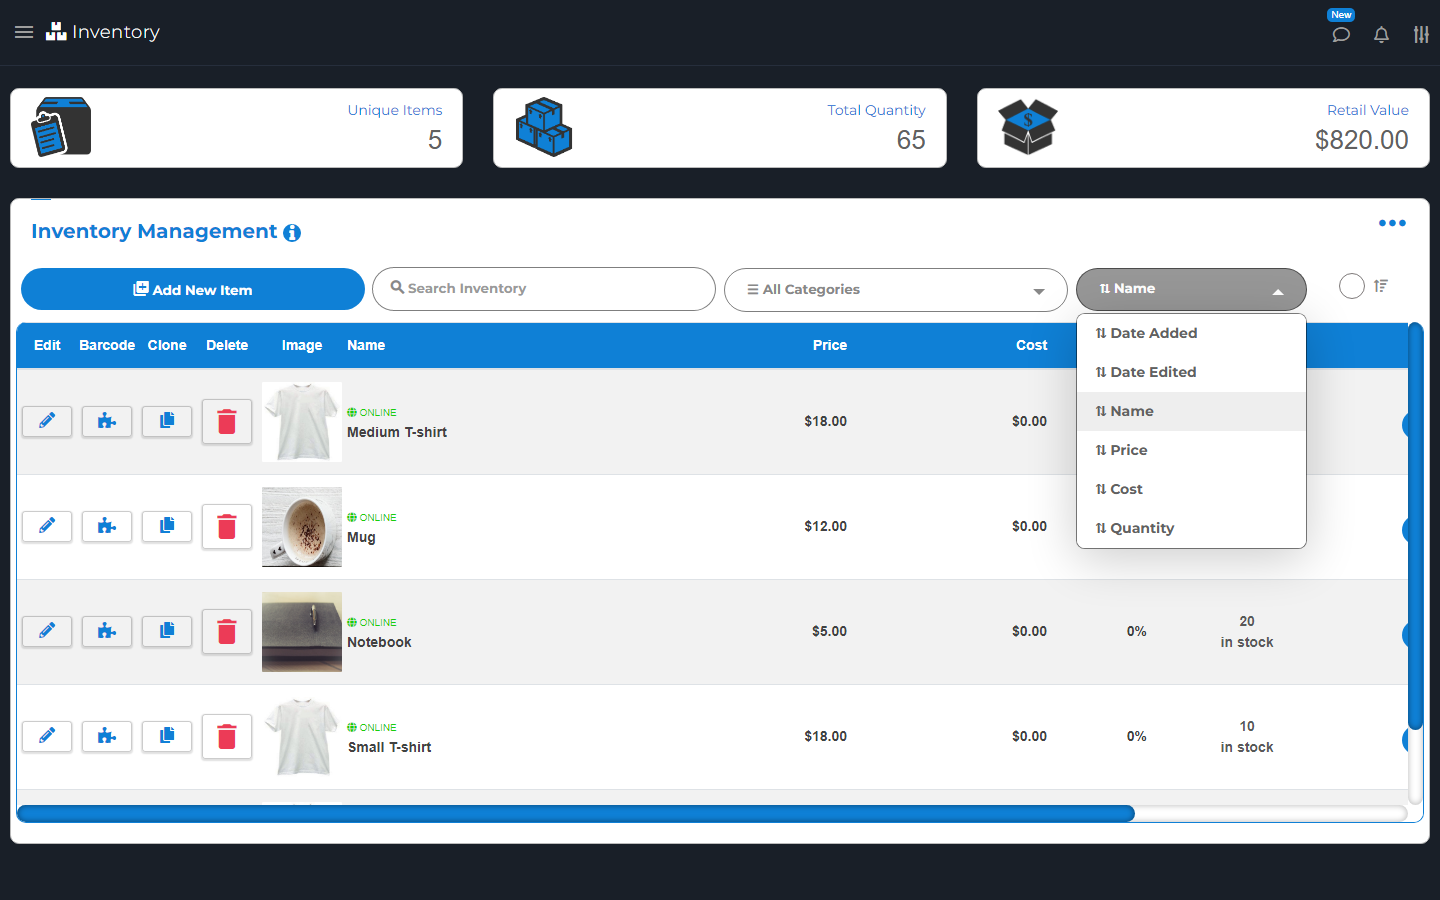
Use Sort in Inventory. Choose a field, such as name, price, cost, stock, or date. Reverse turns that order around.
Sorting changes how you see the list. It does not change your items.
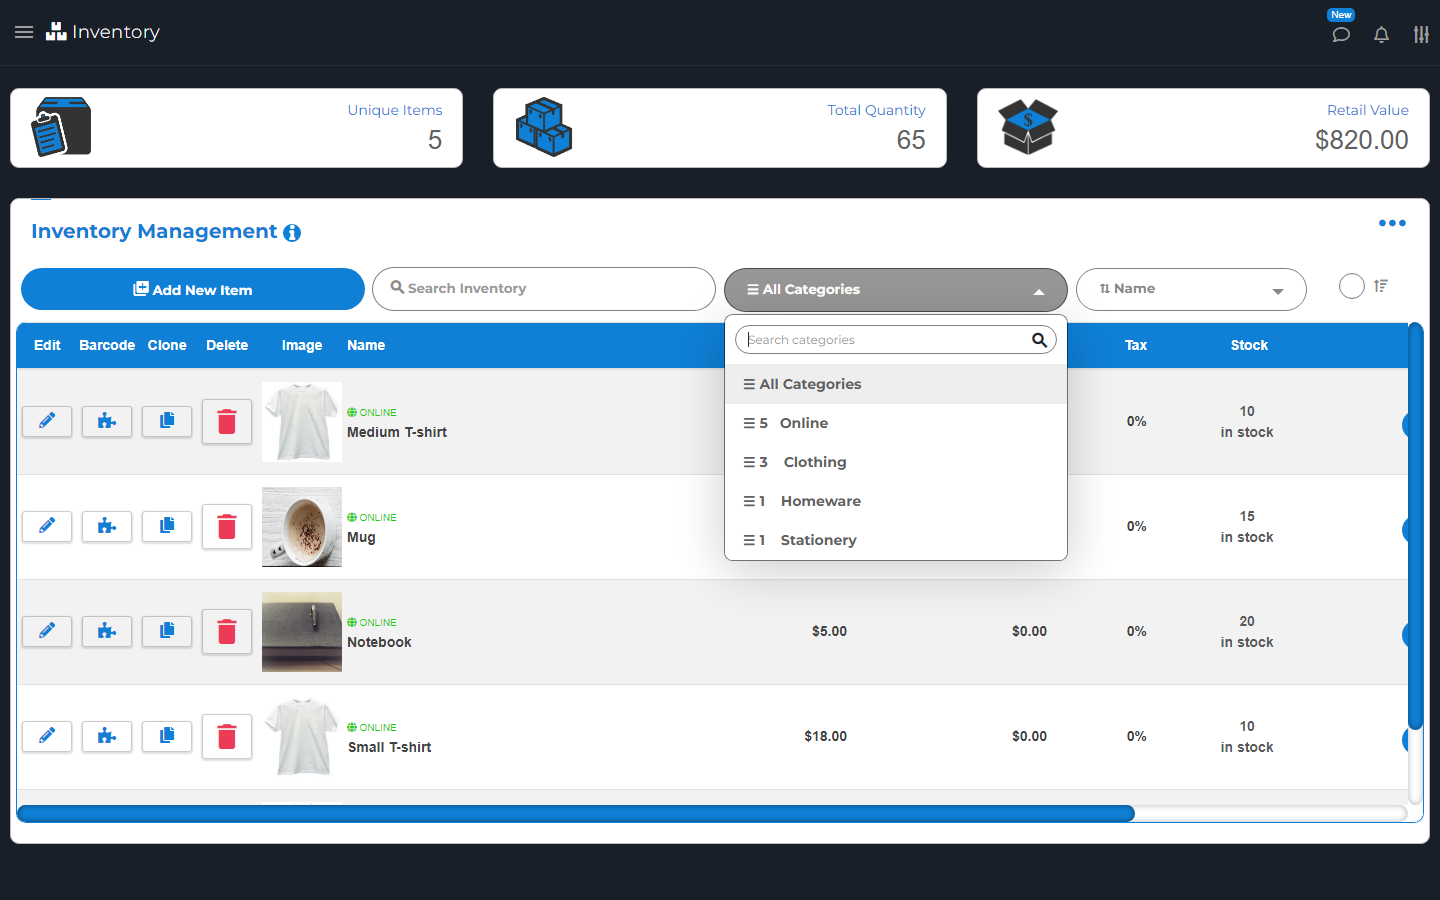
Use the category list in Inventory. Choose a category to see its items. Online shows items set up for the shop. Uncategorized shows items with no category.
Choose All Categories to see the full list again. A search can narrow the list too.
Open Delete Categories from the Inventory menu. Find the category and choose its delete button. Check the message before you confirm.
This removes the category from items. It does not delete the items. They become Uncategorized.
Updating Item Stock
To set the total you have, edit the item and change Quantity in Stock. Save it.
To add new stock by scanning, open Update Item Stock from Inventory. Scan each item you receive. Check the count shown. Use Add +1 to add one more when needed.
Setting Quantity in Stock replaces the total. Scanning received stock adds to it.
Import Inventory
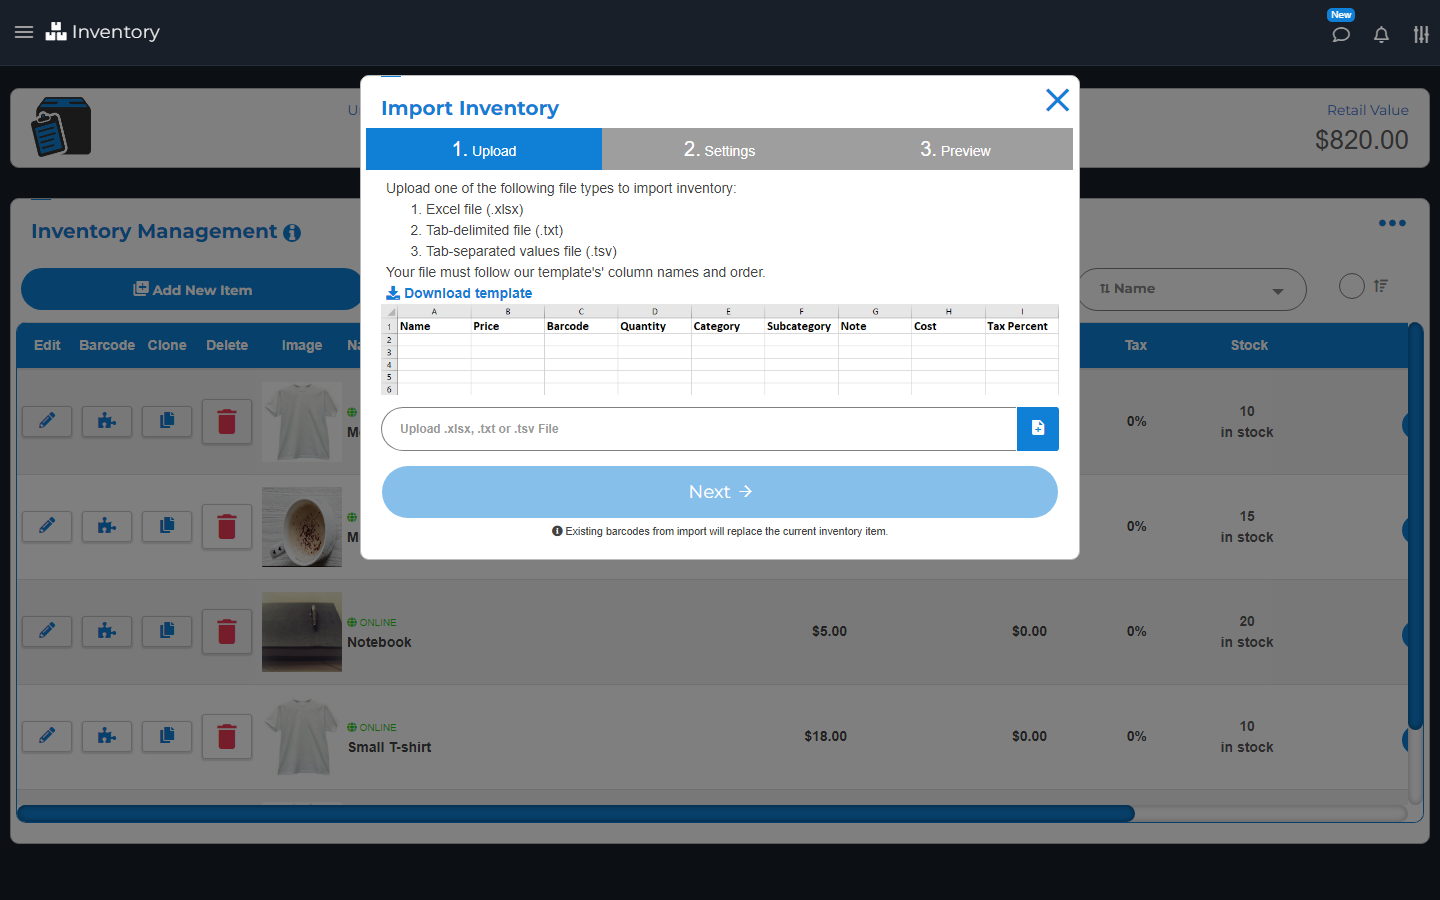
Import means add a list from a file. Make a backup with Export Inventory before you replace any items.
Open Inventory and choose Import Inventory from its menu.
Choose Download template. Use that file's column names and order.
Fill in your items. Keep each barcode unique. Keep any starting zero in a barcode.
Upload an Excel .xlsx, .txt, or .tsv file.
Choose the payment types for the items. Choose Next.
Check the item preview and the tax profiles shown.
Choose Import List only when the preview is right.
A barcode that already exists can replace the current item. The preview shows only the first part of a long list, so check your whole file too. Do not rename a file to make it look like a different file type.
Download the template, fill it in and choose the file to import. T-shirt photo: GlennD09. Mug photo: Ryan Adams (cropped). Both CC BY 2.0. Notebook photo: Thomas Martinsen, CC0.
Print Inventory Barcodes
Add-on
Add-on: Print Inventory Barcodes.
This needs the barcode printing add-on and a printer that works with your device.
Find an item in Inventory and choose Barcode. Check the name, code, and price in the preview. Choose Print Barcode. Test one label and scan it before you print a large batch.
Item Collections
Open Inventory > Item Collections > Add New Collection. Name the collection and choose its items. Save it.
Use the collection in Printer Stations or Order Stations to send work to the right place. A collection is not the same as a shop category or a package deal.
Deleting Items
Find the item in Inventory and choose Delete. Read the message and confirm only if it is the right item.
Delete All Inventory removes the whole list. Export a copy first. Do not use it just to hide one item online. Turn off that item's online setting instead. Do not assume a deleted item can be brought back.
The Bulk Editor is a grid of items. It lets you change more than one item on one screen.
Open Inventory and choose Bulk Editor. Check which items are in the grid. Use Columns to choose the fields you want to see.
Save Bulk Editor Changes
Check the highlighted cells and selected count before typing. A change in one selected cell can apply to every selected cell in that column. Select only the items you mean to change.
Change the cells you need.
Check each changed value and any error beside it.
Check the number of pending changes. Pending changes have not been saved yet.
Choose Save and wait for the result.
Keep the grid open if a save fails. Fix the error and try again. Use Cancel only to discard pending changes. Check the item list after saving, especially prices and stock.
Clone or Delete Items in Bulk Editor
Select only the rows you want. Check the selected count before you choose Clone or Delete.
Check new copies for unique barcodes. Before deleting, read the message and check the item names. Do not select the whole grid if you only mean to delete one row.
Copies and deletions stay pending until you choose Save. Review them first. Cancel discards the pending changes.
Products & stock
Variations
Link the choices for a product to the right items.
A variation is a choice for one product, such as a small or large shirt.
Open Inventory > Variations.
Choose Add Variation and enter a name, such as Sizes.
Under Varieties, use Add variant to enter values such as Small and Large. Choose Save Variation.
Open the Groups tab. Choose Create Item Variations and select the source inventory item.
Select the values, then choose Next: Preview Generated Items.
Check the items, prices, and stock. Each new item starts with the source item's stock quantity and online-sale setting. The quantity is not split between sizes or colors, and this preview does not let you edit stock. Check the source settings before creating online items. The Create button shows how many items will be created. Use it only when the preview is right.
Use Groups to edit linked items later. Add Existing Item links an item already in Inventory. Generate Variations Only lets you preview missing items for the group. Check each item's barcode and choose Save Group after editing the group. Check that each value is linked to the correct item.
Use Item Variations Online
Turn on online sale for the items in the group. Check each online price and photo.
Open the product in your shop. Choose each size or color and check the price and stock shown. Group choices must match the right inventory items. Old color and size fields do not replace a correctly linked variation group.
Products & stock
Item Modifiers
Add-on
Set up modifiers and modifier groups for your items.
A modifier is a choice a buyer can add to an item, such as cheese on a sandwich. A modifier can have its own price.
Open Inventory > Item Modifiers. Modifiers lists the modifiers. Groups lists modifier groups.
Adding Modifiers
In Item Modifiers, choose Add New Modifier. Enter a name, such as Cheese. Add a picture if needed. Choose Save Modifier.
Set the modifier price when you add it to a group.
Editing Modifiers
Find the modifier in Modifiers and choose Edit. Change its name or picture and save. Check any groups that use it.
Adding Groups
Open Groups > Add New Group.
Enter the Group Name.
Set Minimum Required and Maximum Limit. These say how few or how many modifiers a buyer may pick.
Select the modifiers and set their prices.
Choose Save Group.
Set Minimum Required to 0 when the buyer does not need to choose a modifier.
Editing Groups
Find the group and choose Edit. Check its modifiers, prices, minimum, and limit. Save the group. Check an item that uses it before you sell.
Cloning Groups
Choose Clone on the group. Give the copy its own name. Change its modifiers and prices, then save. Attach the new group to the right items.
Attaching Modifiers
Use Set Item in Item Modifiers to choose the items that use the modifier or modifier group. Check the selected items and save.
Try the item on Sell. For an online item, check its page in the shop too. Make sure the required modifiers and their prices are right.
Selling Modifiers
Add the item to the cart. Pick the modifiers the buyer wants. Meet any required choice rules.
Check the modifiers and their prices in the cart before taking payment. In the online shop, the buyer selects modifiers on the product page.
Deleting Modifiers
Find the modifier and choose Delete. Read the message before you confirm. Check the items and groups that used it so buyers still have the choices they need.
Deleting Groups
Choose Delete on the group. Read the message before you confirm. Check the items that used it. Deleting a group is not the same as removing a modifier from one sale.
The package still uses real inventory items. Check the count of each item in the bundle.
Create and Sell Packages
Open Inventory > Packages > Add New Package.
Enter a name and choose the items.
Set how many of each item are in the package.
Enter Package Retail Price and choose Save Package.
On Sell, choose Packages and add the package to the cart.
Check all its items before payment. Removing a package line can remove its linked lines too. The sale affects the stock of the items in the bundle.
For online sale, turn on Add to online store?. Set the online price, text, and images. Open the package in your shop and check its Package includes list.
Use the Sell Weighted Items add-on to sell by weight. For example, the price can be for one pound of an item.
Set the right weight unit first. A scale is not required when you enter the weight by hand.
Configure Unit of Weight
Open Settings > Scale Settings. Set Unit of Weight to pounds or kilograms. Use that same unit when you set item prices and enter weight.
Add Scalable Items
Edit the item in Inventory. Turn on Sold By Weight and set the price for one weight unit.
Weight Tear is the app's label for the weight to take off, such as the bag or box. Set it only when needed. Save the item and check one sale before using it for customers.
Sell Scalable Items
Add the item on Sell. Enter the weight when asked, or use the linked scale. Check the unit, weight, and total before you take payment.
The receipt shows the weight used for that sale.
Scale Hardware Integration
Add-on: Scale Device Integration.
Ask Support to check your scale model and device before you buy or connect it. Support depends on the scale model and your device.
For a supported desktop scale, set its serial port in Scale Settings. Use the connection name assigned to the scale on your computer. Ask Support if you are unsure which port to choose.
Use No Scale On This Device? when you need to enter weight by hand. The Scale option on Sell shows a weight reading without adding an item.
A vendor is a person or company you buy stock from. Open Vendors to keep their details and purchase orders.
These purchase orders are different from orders placed by your customers.
Adding Vendors
Open Vendors > Add New Vendor. Enter the name and any phone, email, address, or website you need. Add a staff note if useful.
Choose Add Vendor and check the saved details.
Editing Vendors
Find the vendor and choose Edit. Change the fields and choose Save Vendor. Check the email before sending an order.
Set Vendor Items
Edit the item in Inventory and set Item Vendor. Save the item.
This helps you find that vendor's items when making a purchase order. Check Item Cost too. It is what you pay the vendor, rather than your retail price.
Creating Orders
Choose Add Order or New Order for the vendor. Select the items and set how many you want. Check costs, tax, and totals.
Use Save Draft if it is not ready. Choose Place Order when ready, then use the send option if you want the vendor to receive it. Saving an order is not proof the vendor got a message.
Editing Orders
Open the vendor's Orders list and choose Edit. Change the items or amounts, then save.
If the vendor already has the old order, tell them what changed. Do not assume a saved edit sends a new message.
Accepting Delivered Orders
Open the purchase order and use Delivered or the shown complete-order action.
Record how you paid. Choose Save As Expense only if needed.
Check each Quantity Received and item cost against what arrived.
Choose the cost-average option only if that is how you track cost.
Choose Update & Complete when the details are right.
When it completes, the received quantities are added to stock and the purchase order is marked Delivered. Missing quantities do not stay open in this order. Before completing it, keep the original order details and agree with the vendor how to handle anything still owed. Do not enter the ordered count as received if some items are missing.
Check saved item costs and any saved expense against the vendor's bill. If the result is not what you expect, contact Support before relying on it.
Deleting Orders
Find the correct purchase order and choose Delete. Read the message and check its delivery state first.
Cancel with the vendor separately if they already received the order. Deleting your record does not notify them or return a payment.
Deleting Vendors
Choose Delete for the right vendor and read the message. Check open orders first.
Deleting a vendor record does not cancel an order you already sent to them.
Use Sell to add items to a cart. A cart is the list of items the buyer will get.
Check the items, amounts, tax, fees, and total. Then choose a payment method. After the sale is complete, give the buyer a receipt.
Add Items to Cart
Add an item using one of these methods:
Scan or type its barcode in the barcode field.
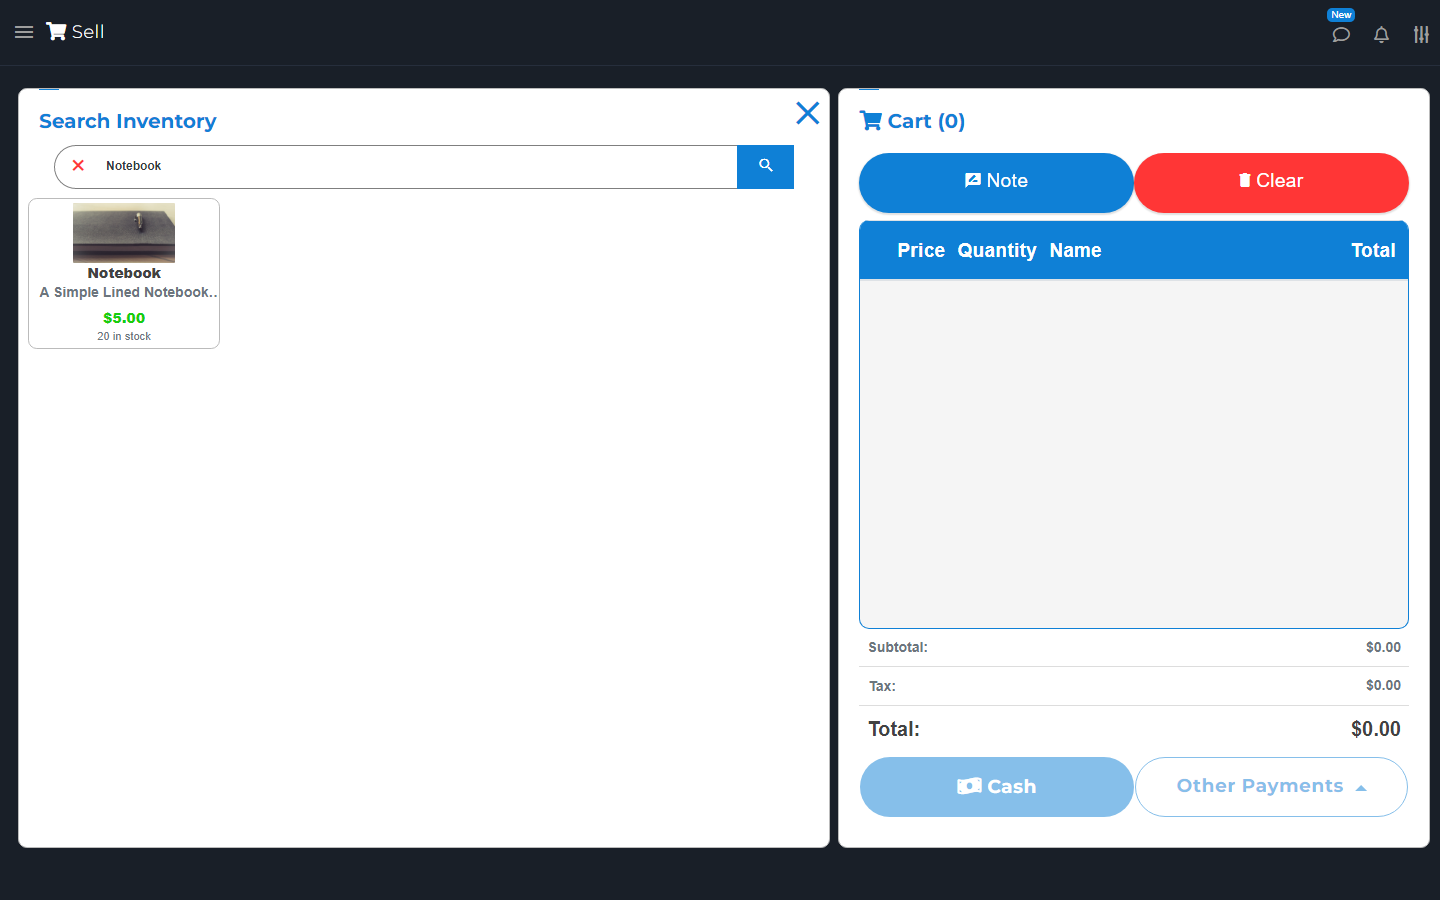
Choose Search to find it by name.
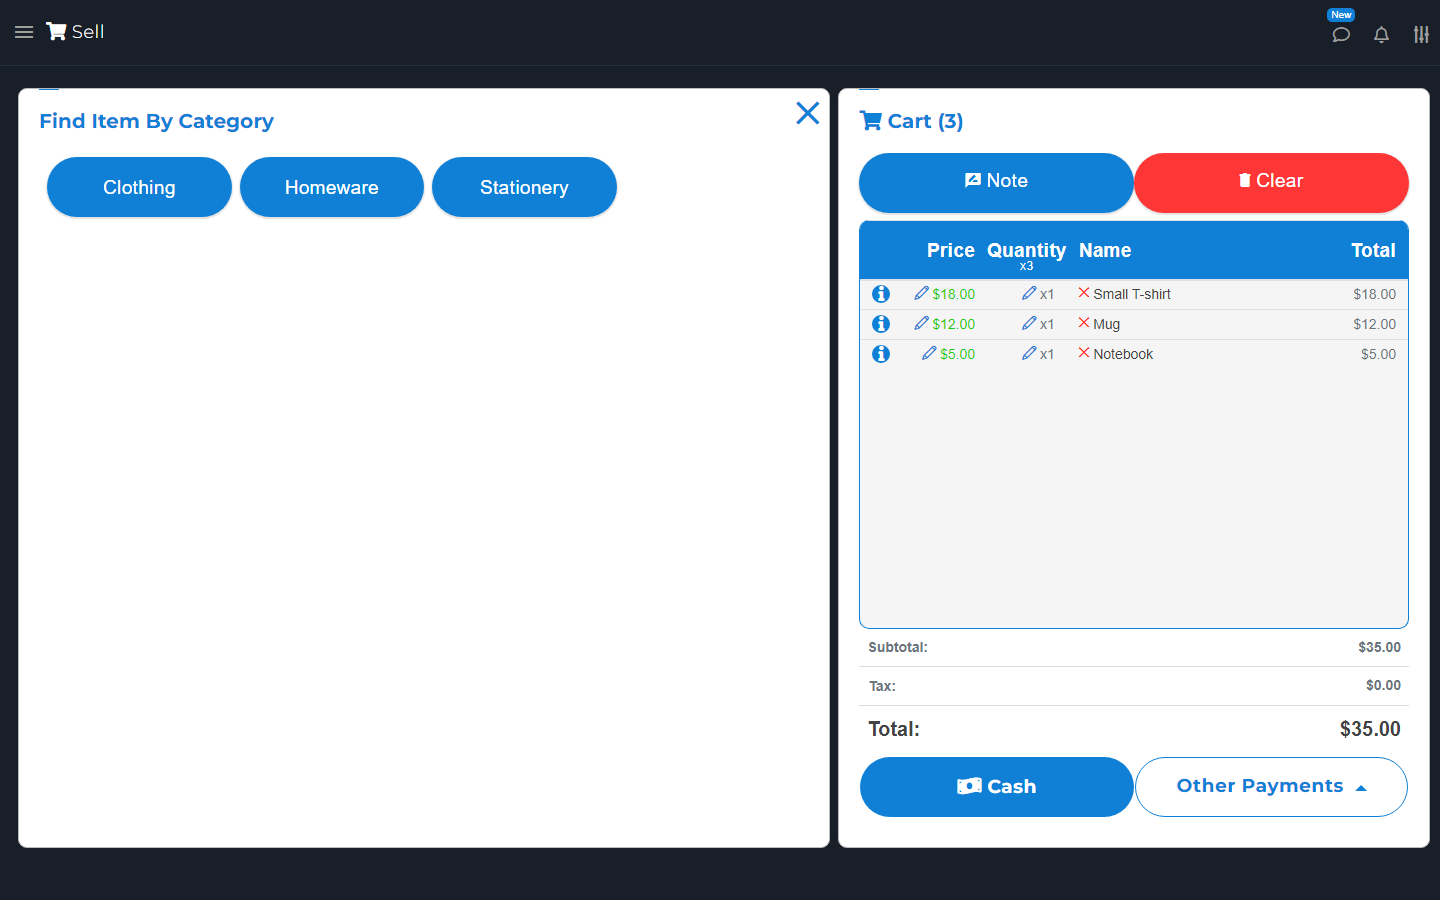
Browse Categories and choose the item.
Check the added item in the cart.
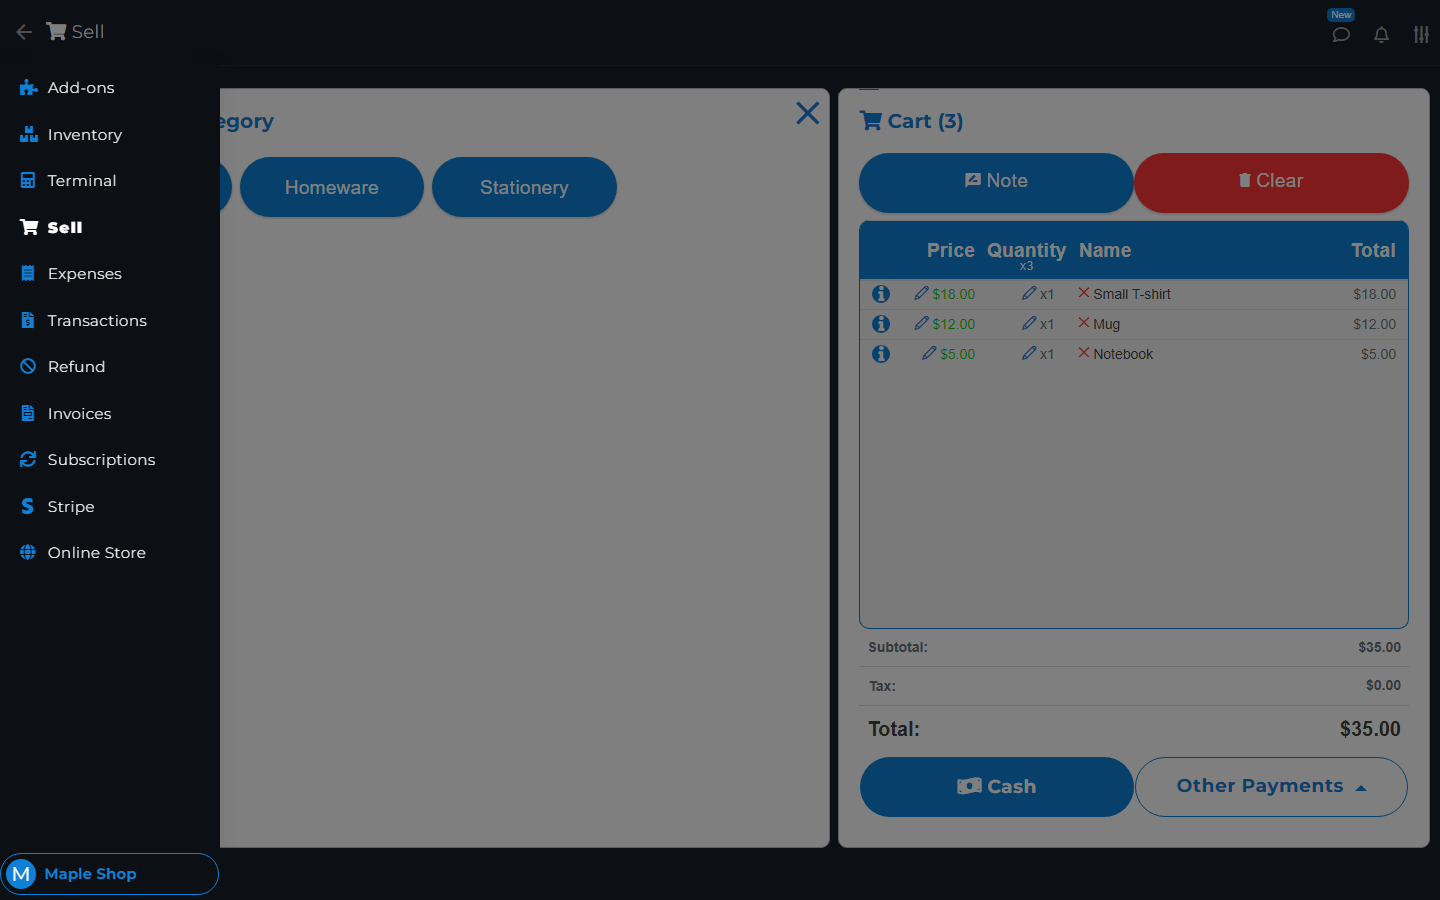
Check the items, prices, and total in the cart.
To change an ordinary item's quantity in the cart, choose its number or pencil in the Quantity column. Enter the quantity and choose DONE. Check that line and the cart total. Special items, such as weighted items, use their own controls.
Use Add +1 for one more of the last item. A phone may show a camera scan button. Keep a hardware scanner aimed at the right input field.
Use Clear only when you mean to remove the current cart. Read the message before you confirm.
Search for an item, then choose it from the results to add it to the cart. Notebook photo: Thomas Martinsen, CC0.
Choose an item quantity with the number pad, then check the cart total. Notebook photo: Thomas Martinsen, CC0.
Give Discount
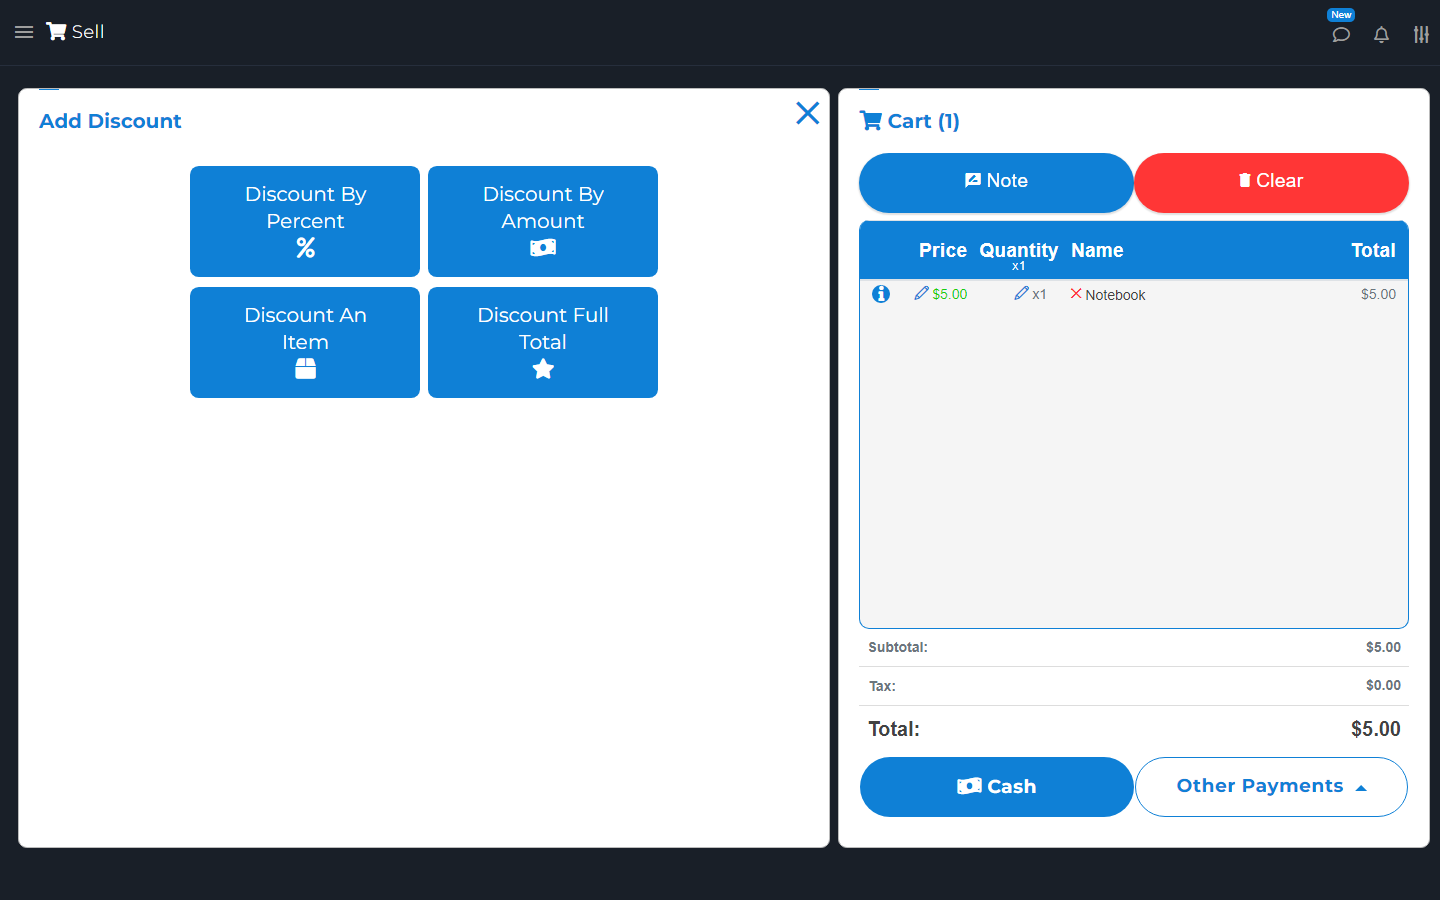
Choose Discount. Choose whether it applies to an item or the full sale. Enter a fixed amount or choose Percent.
Check the discount and new total in the cart. Check any other discounts already there so you do not give the same discount twice.
Choose a discount type and enter the amount before finishing the sale.
Add a Note
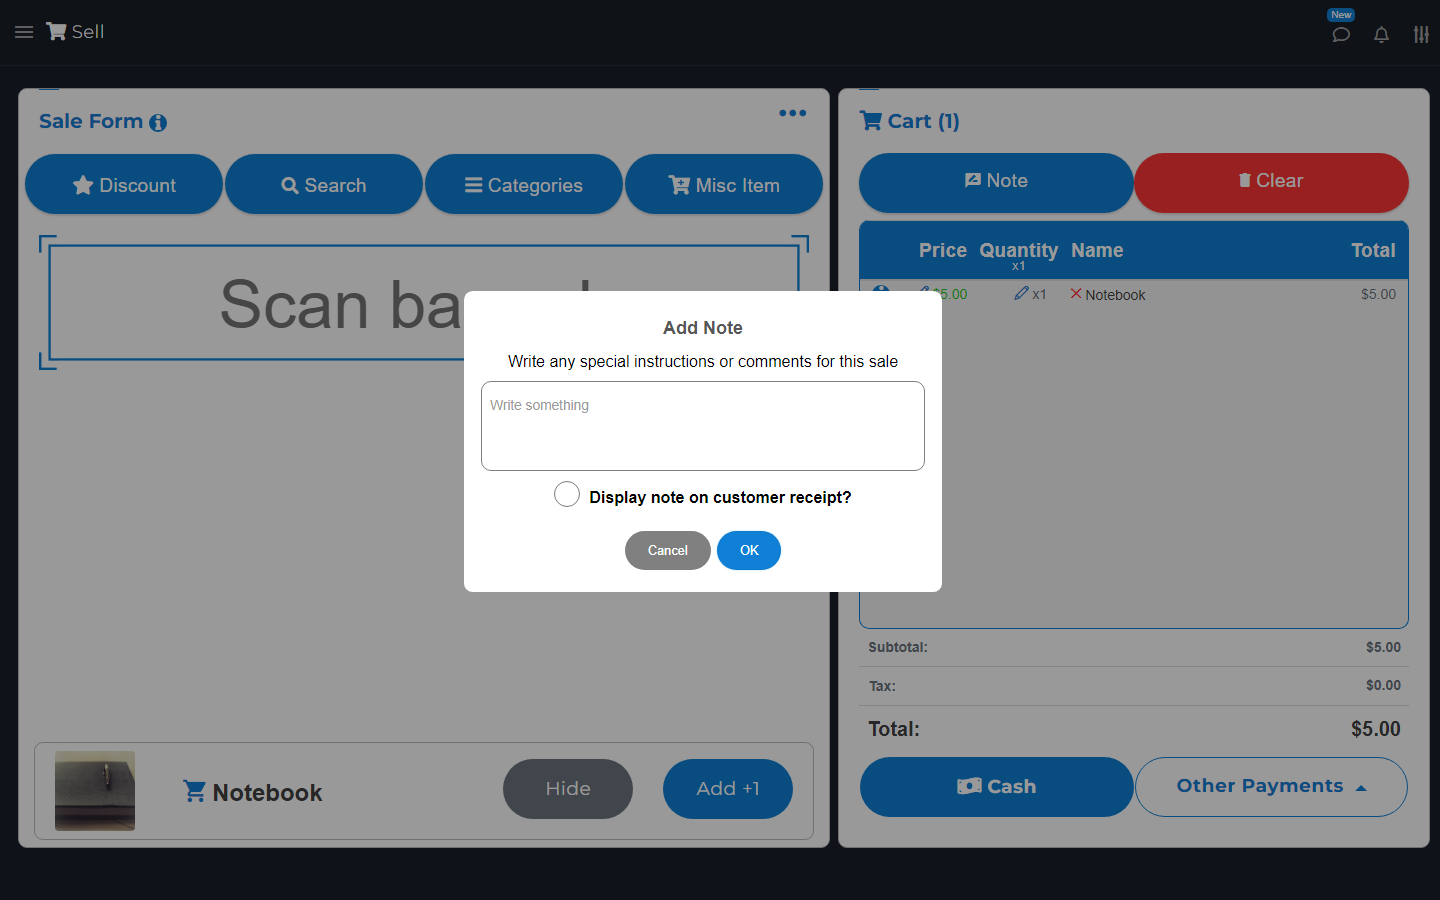
Choose Note above the cart. Enter your note. Use the receipt option only if the buyer should see it.
Open Note again to change or remove it. Do not put passwords or card details in notes.
Write a note for this sale before you finish checkout. Notebook photo: Thomas Martinsen, CC0.
Suspend Sale
Add-on
Add-on: Suspend Sale.
Open Sell's menu and choose Suspend. Wait for Cart suspended successfully. You can then serve another buyer.
Choose Resume and select the right saved cart by its number and date. Resuming replaces the current cart. Finish or suspend that cart first. Check the restored items and total before payment. A suspended cart is not paid.
Remove All Suspended Carts removes the store's saved carts. Use it only when all of them can be removed.
Checkout
Check the cart first. Choose the quick pay button or open Other Payments to see the other choices. The item settings can limit which methods you can use.
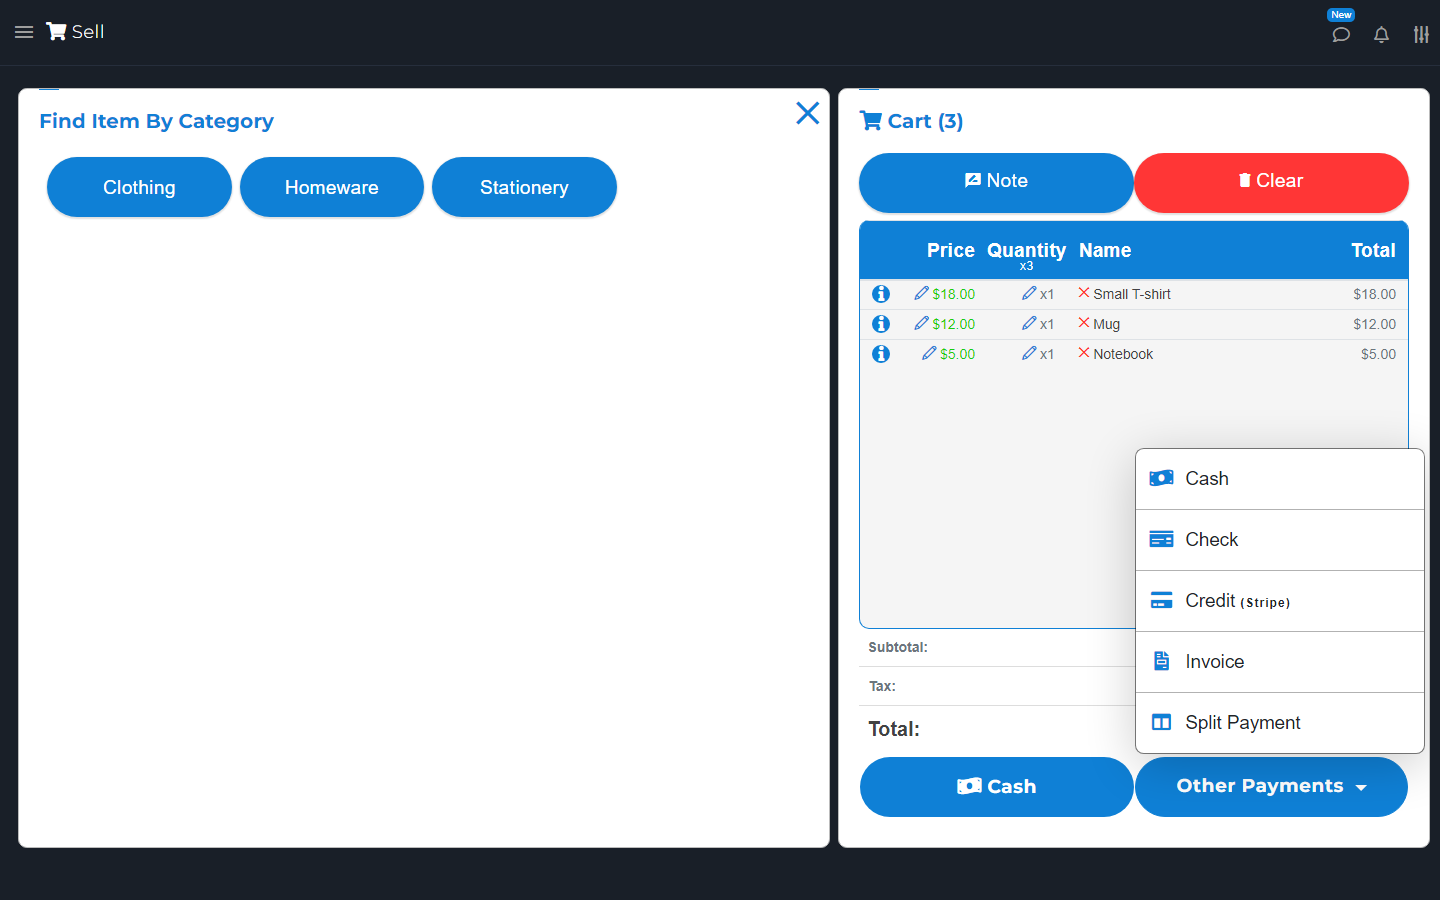
Open Other Payments to see more ways to pay. Your choices may differ.
For Cash, count what the buyer gives you. Use the calculator to enter the amount received if you need the app to work out change. Check Change back, then choose Complete Sale, or Complete on a small screen. When Sale Complete appears, choose View to check the receipt, or use the receipt option you need. For Check, enter its number if needed.
A payment label such as Credit or Gift Card can record a payment made outside this app. It does not charge a card on its own. Follow the message on screen. Complete the sale only after that payment is approved.
For a linked reader or online payment, wait for the result. If the result is unclear, check Transactions and the payment account before charging again.
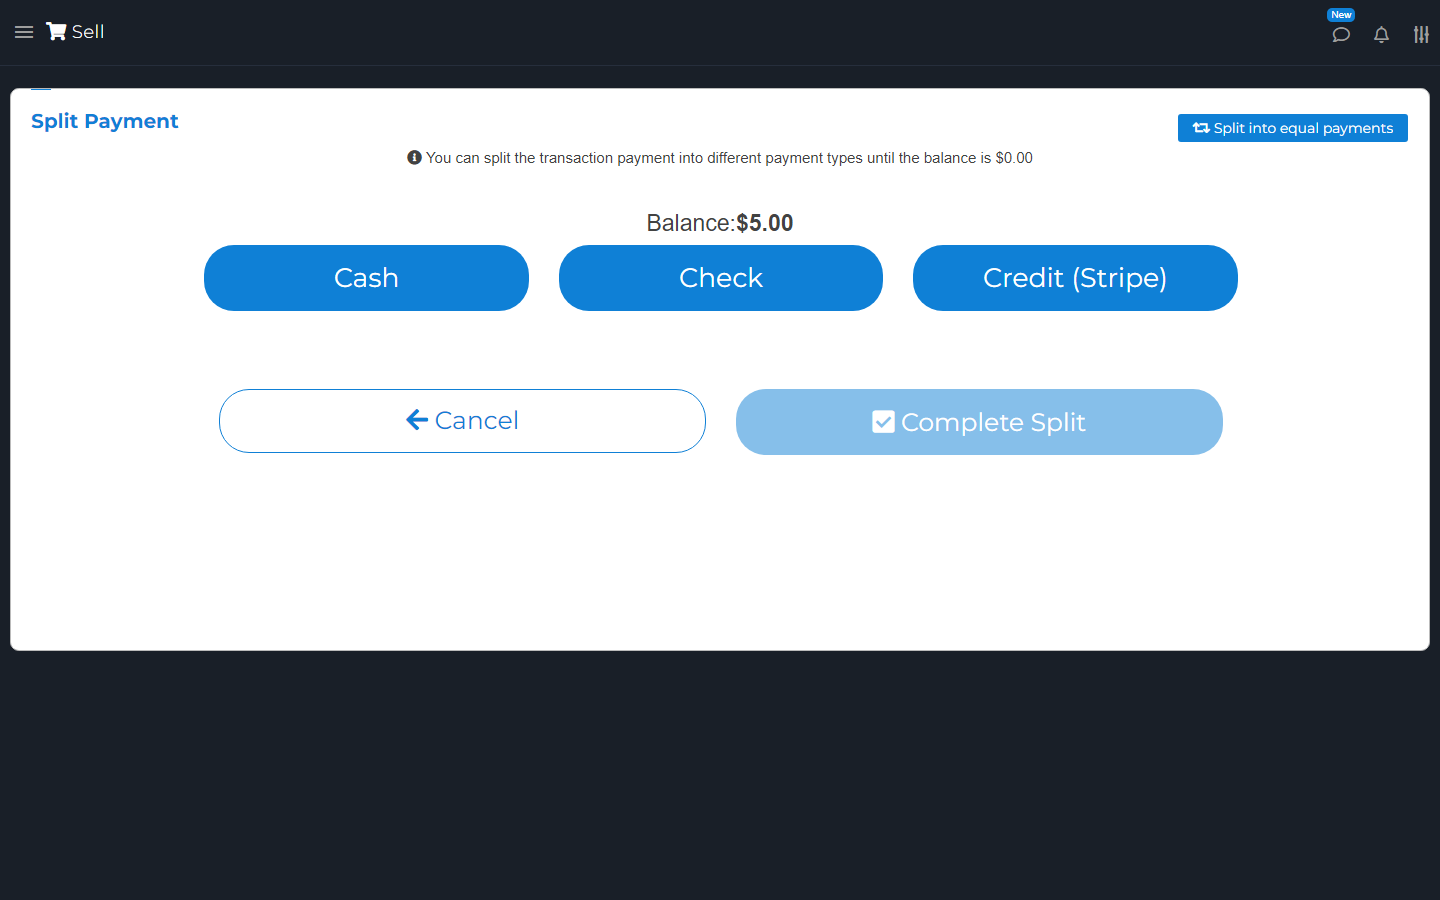
On Sell, open Other Payments and choose Split Payment. On a small screen, the menu says Payments. Choose a payment type, then enter the amount for that part. Add the other parts until the balance is zero. To divide the sale into equal shares, choose Split into equal payments and enter how many shares you need.
A zero balance here means the amounts are allocated. It does not prove that the payments have completed.
Choose Complete Split and follow each payment step. Wait for the final result. Check every part in Transactions afterward. If a card step is unclear, check it before starting again.
Choose the amount and payment type for each part of the sale. Do not finish until the amounts are right.
EBT Payments
EBT is a benefit-card payment. Your store and payment setup must support it. Only mark items as eligible when they meet the program's rules.
For a mixed cart, review Confirm EBT Cart. Move items to the other-payment part if needed. If only part will be paid by EBT, use Pay Partial to enter the EBT Amount To Charge. Check it before continuing with the supported payment flow.
On an integrated reader, this can change the payment request; it is not just a note of money already paid. Wait for the result, then pay the remaining balance with another method. Check both payments before finishing. If an earlier payment may have completed, check it before requesting another. Recording an EBT label does not by itself charge the benefit card.
Sending Receipts
After Sale Complete, choose the receipt option you need. You can print with a connected printer or use a digital option shown in the app.
Check the email or phone number before you send. Text delivery depends on the options and carrier shown. Use View to open the online receipt. You can send it again from Transactions.
Sending a receipt is not consent to send ads. See Notify Customers.
Receipt Printer
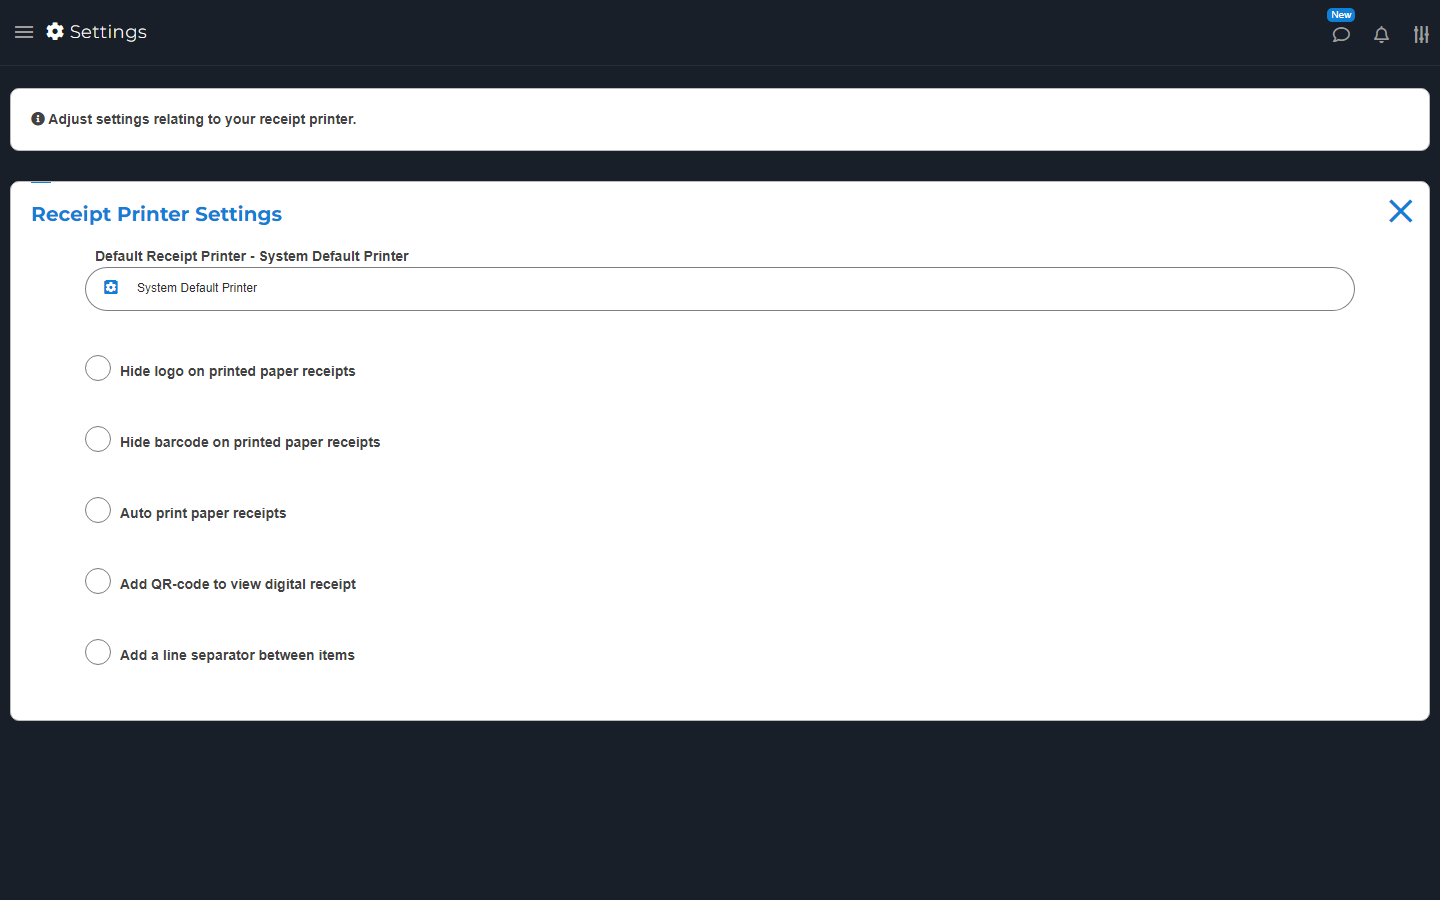
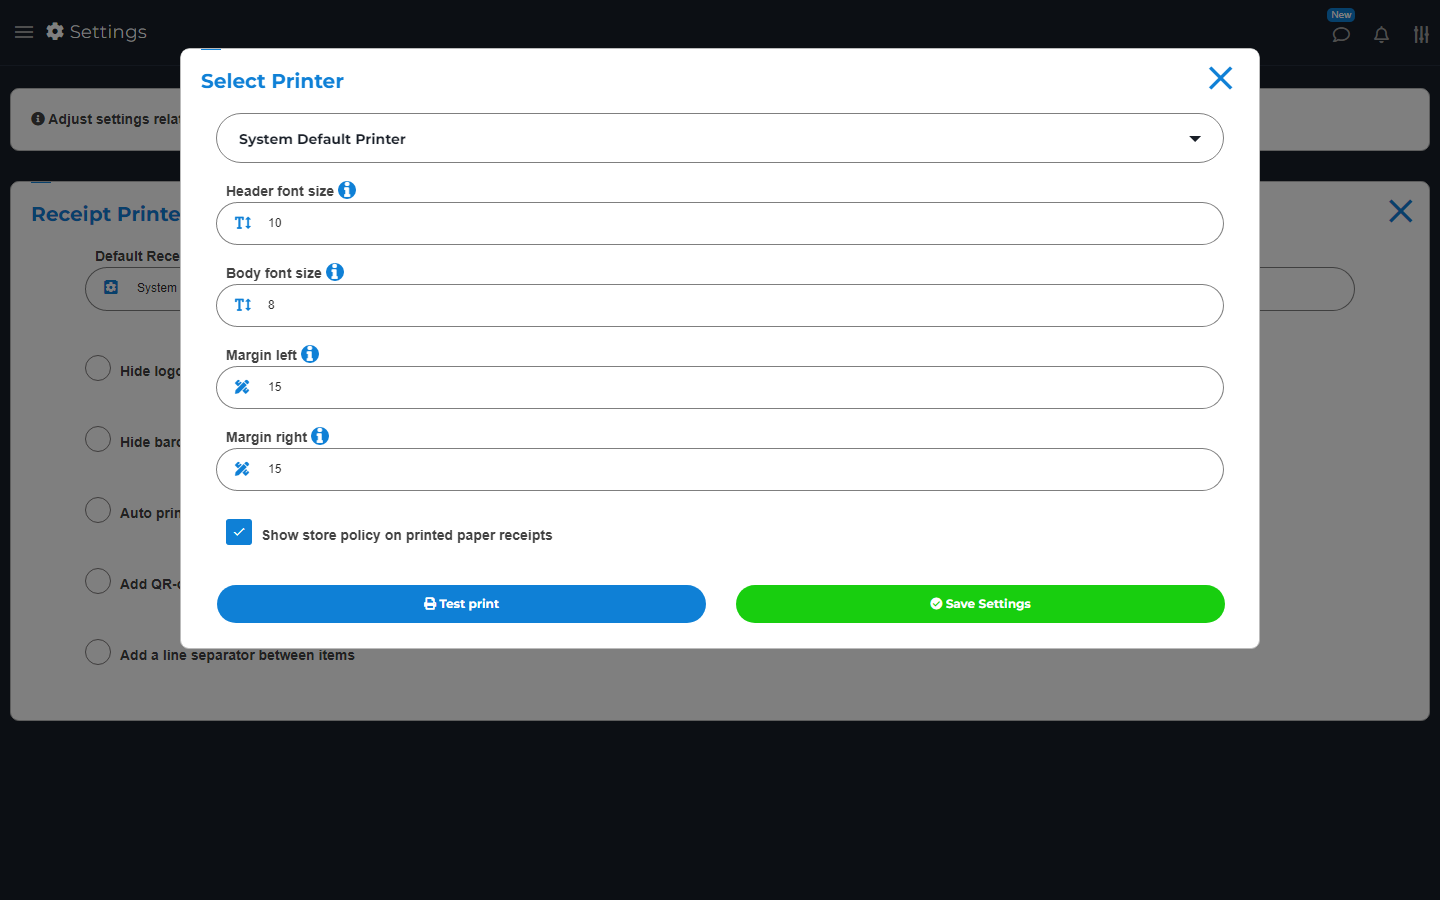
Open Settings > Receipt Printer. Choose the default printer. Set auto-print and options for the logo, barcode, item lines, and customer or order details.
You can add a QR code that opens the digital receipt. A QR code is a square code a phone can scan. Print one sample and check it before using the settings for customers.
Sell Settings
Open Sell's menu and choose Sell Settings, or open it in Settings.
You can choose the first sale form, quick pay button, next-sale timer, cash buttons, and default discount or fee. Check defaults carefully because they can affect every sale.
Cart choices include combining the same item, selling out-of-stock items, shown totals, and text size. You can change sounds and item pictures too. Other choices include a required customer, default order type, receipt signature, and printing a suspended sale.
Check one cart after changing settings. Some choices only show with the right add-on or device.
Void Mode
Add-on
Add-on: Void Mode.
With the Void Mode add-on, choose Void Mode in Sell's menu. Items added in this mode have negative amounts. Check the red return lines.
Choose Exit Void Mode before adding normal sale items. Check the final total and payment method before finishing.
This is not proof that money went back to a card. For a return tied to an old sale, use Refund and check the payment result.
Fave Buttons gives you quick buttons for items you sell often.
These buttons add real inventory items. They do not create a separate item list.
Set Fave Buttons
On Sell, open the three-dot menu at the top right of Sale Form and choose Edit Fave Buttons. Choose a button, search for the inventory item, and select it. Check the item name on the button. Close the item chooser, then use the close button beside Fave Buttons to finish editing before starting a sale.
Use Fave Button
Choose the item's fave button to add it to the cart. Check the count and price before payment. Use the normal item choices if it needs a weight, serial number, or modifier.
Unset Fave Button
Edit the fave button and choose Unset. This clears the shortcut. It does not delete the item from Inventory.
A coupon is a discount with a code or a rule. The Coupons add-on lets you set the offer, dates, and when it can be used.
A coupon can apply to a whole sale or chosen items. Check its rules before telling buyers they can use it.
Adding Coupons
Open Coupons > Add New Coupon.
Enter a name, code, and discount. Choose a set amount or percent.
Set the start and end dates.
Set When To Give and When To Apply. These are separate rules.
Choose any item, count, or spending rule. Check Auto apply coupon and the customer rule if used.
Choose Save Coupon.
Turn on Show on coupons online page if you want buyers to see the offer in the shop. Check its page and try a matching cart before you share the offer.
Editing Coupons
Find the coupon and choose Edit. Change the offer or rules, then save. Check its dates, code, and online setting again.
Use Clone to make a separate offer from a copy. Give the copy its own name and code.
Giving Coupons
When To Give controls when a coupon is offered, such as after a set spend or item purchase. Never means it is not given by that rule.
Use Share to share the coupon. Check the code, dates, and rules on the shared page. Giving a coupon does not mean it has been used.
Applying Coupons
On Sell, choose Apply Coupon and enter or choose the code. Make sure the cart meets its rules. Attach a customer if the coupon requires one.
Check the discount before taking payment. Online buyers enter a code in checkout. Some offers also have Clip or Use at checkout on their page; buyers must still meet the offer rules.
Deleting Coupons
Find the coupon and choose Delete. Read the message before you confirm. Remove old ads for that offer too, so buyers do not expect to use it.
Open Transactions to see completed sales and refunds. The top totals apply to the date and view you chose.
Use the date, payment filter, and list view to find what you need. Check a sale's full details, not just its total.
View Transactions
Choose the sale date, then open the sale. Check its items, total, payment, staff name, customer, and notes.
Choose Receipt to view or send a receipt again. Choose Refund for a return. If a sale used a card, check its payment status too.
Find a Transaction
Enter or scan the receipt number in Transactions. You can also pick its date and payment type.
A deleted sale may still be found by receipt number. Deleting a record is not a card refund.
Edit Transactions
Open the sale and choose Edit, if available. Check the cart on Sell, make the needed change, and save.
Do not assume that editing the record also charges or refunds a card. Check the payment result. Use the refund flow when money must go back to the buyer.
Add or check a tip
Open the sale and use Add Tip or Add Tip Adjustment when shown. Check the payment method, allowed amount, and confirmation before saving.
Not every payment supports a later tip. Do not assume a note or edited total charges more money. Check the final payment result.
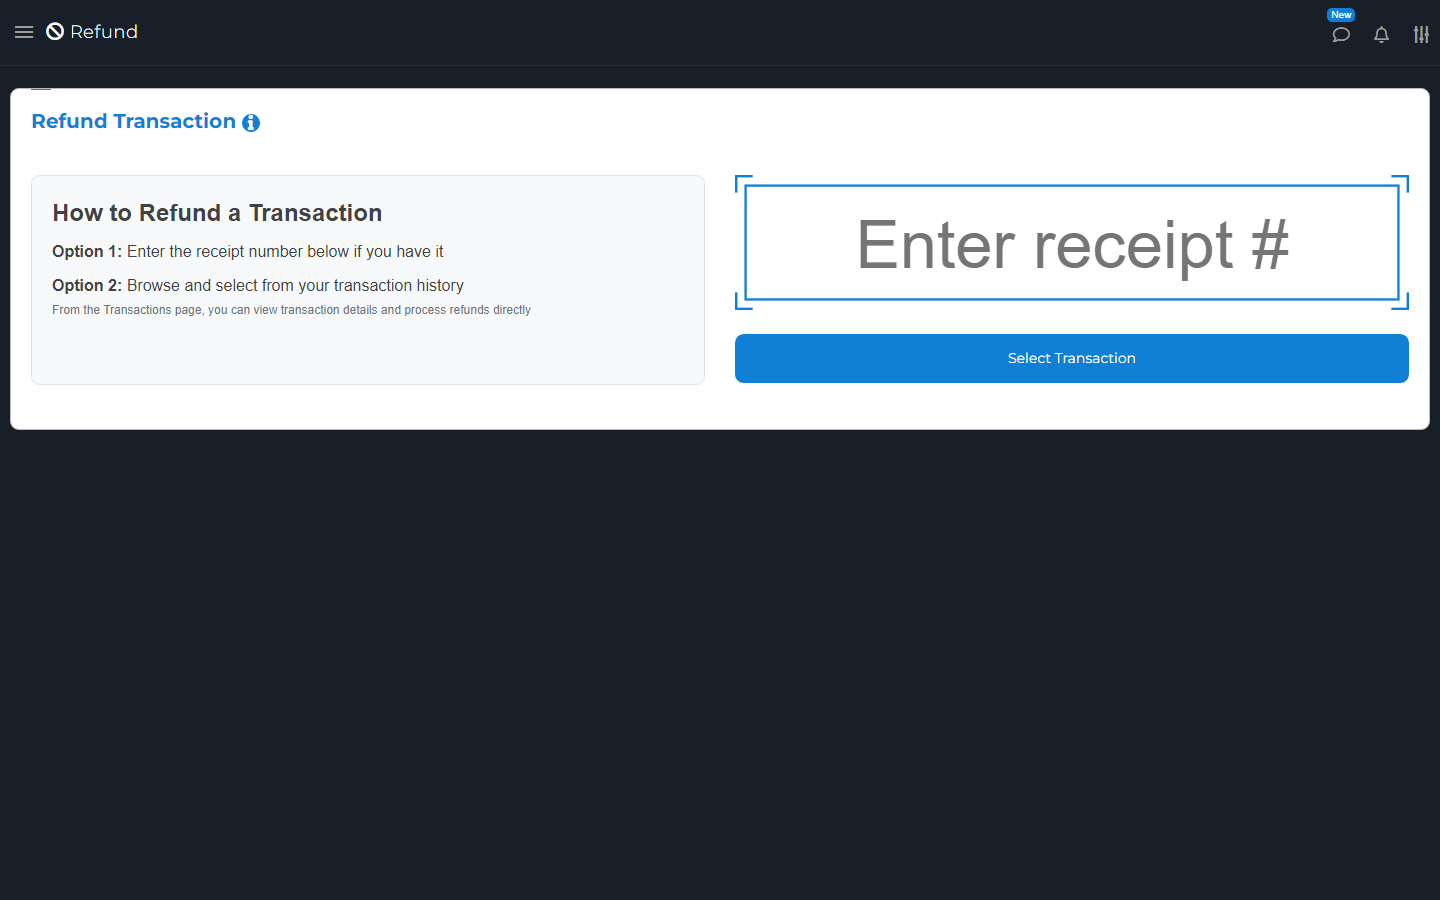
Use Refund to return all or part of a sale. Find the original sale when you can. Check the returned items and amount before you confirm.
Deleting a sale or removing an item from a new cart does not refund a card payment.
Refund Sale
Open the sale in Transactions and choose Refund. You can also enter its receipt number on the Refund page.
Choose one refund path:
For returned items, choose the items and quantities. Check Refund Amount, then choose Next.
To refund an amount instead, choose Refund by amount and enter the amount. Check it before choosing Yes. This opens the refund-method screen.
On Confirm & Refund, enter a reason if needed. Check the amount and method before continuing.
Choosing a refund method starts the refund. Choose it once. Enter an authorized PIN or complete a staff check if asked, then wait for the result.
If a card refund fails or is unclear, check the payment account before trying again. A saved refund record alone is not proof that the bank sent money back. Card refunds can take time to reach the buyer.
Enter a receipt number or choose Select Transaction to find the sale.
View Refunded Sales
Open Transactions on the refund date. Find the refund and open it. Check the amount, items, method, and original receipt number.
For card payments, check the processor's result too. A processor is the company that handles the card payment, such as Stripe.
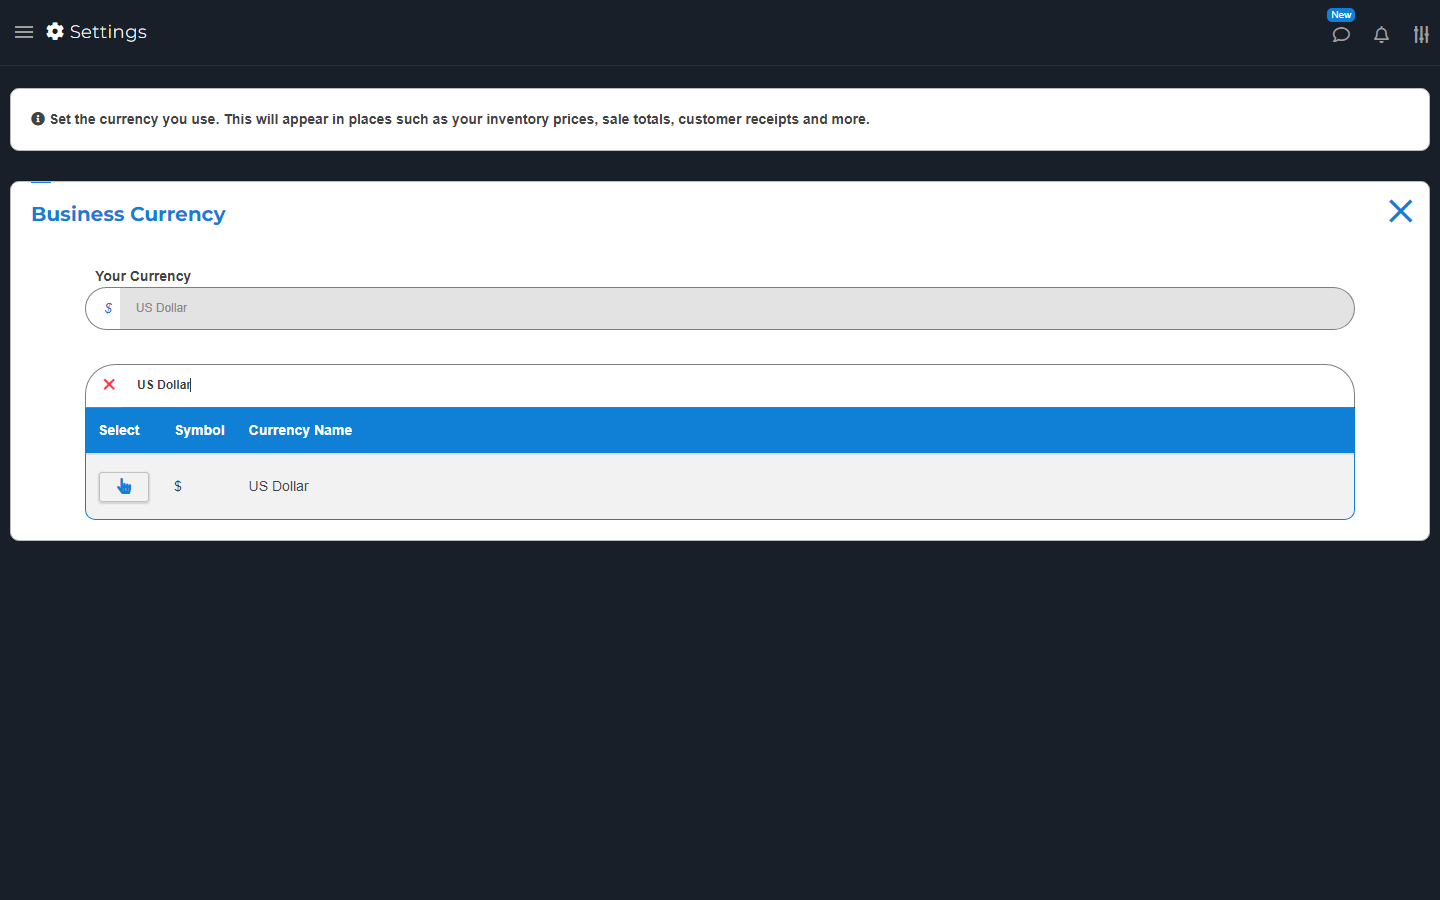
Open Settings > Business Currency and choose your store's currency.
Set this before you start selling. Changing a symbol is not the same as converting old prices or bank payments. Ask Support before changing a working store to another currency.
Search for a currency, then check the name before choosing it.
Payment Types
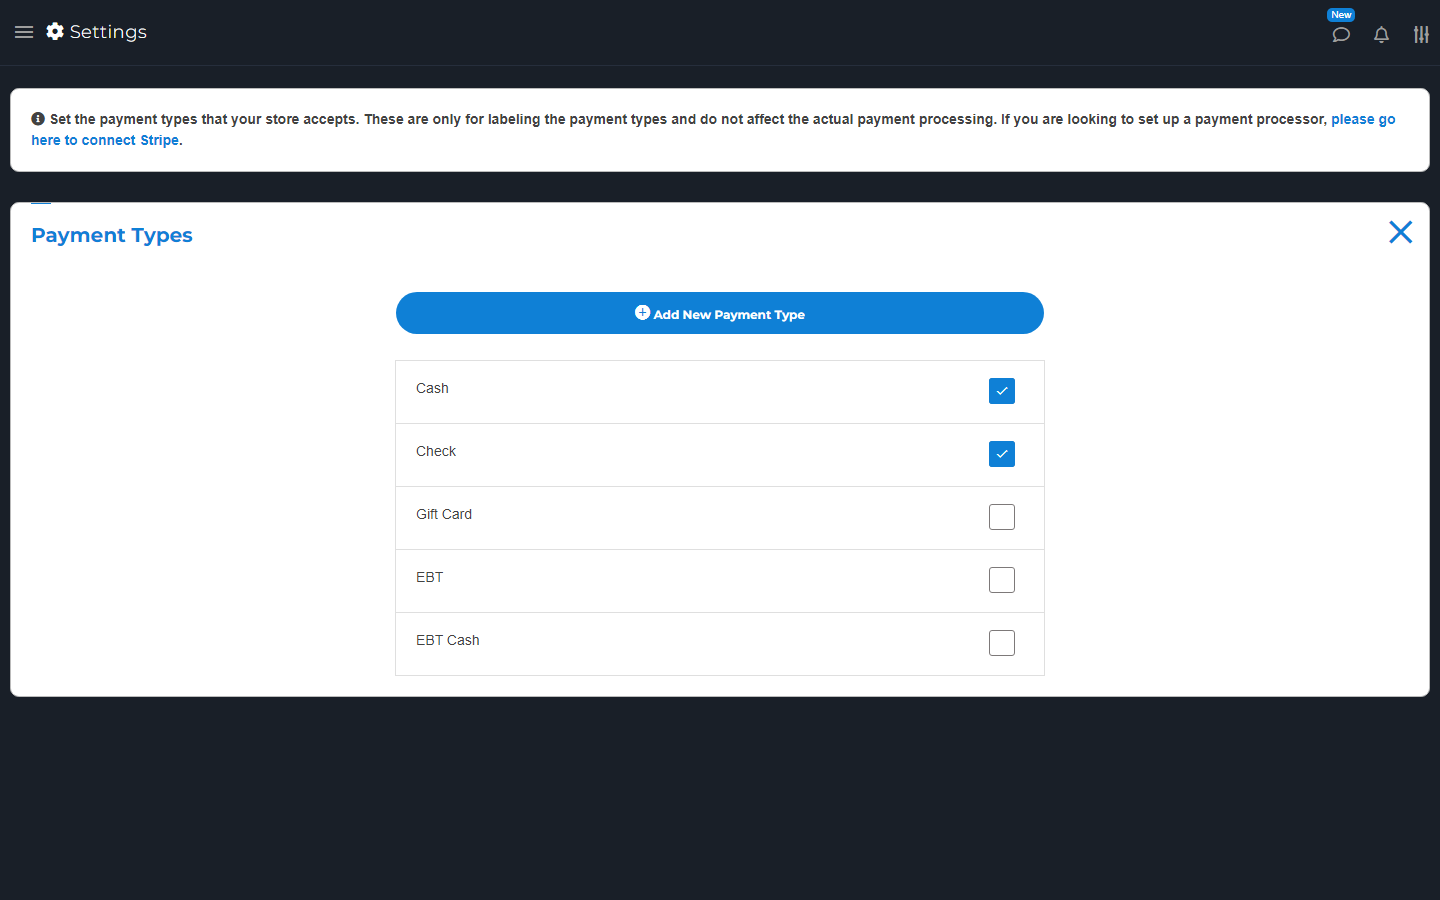
Open Settings > Payment Types. Turn methods on or off, or add a custom name. Set the allowed methods on your items too.
These names label how a sale was paid. Adding a name does not connect a bank or process a card. Set up Stripe or another supported processor separately.
Payment Types controls the payment choices shown at checkout.
Stripe handles card payments for your store. M&M POS sends supported payments to your linked Stripe account.
M&M POS adds a 1% app fee to successful Stripe payments. Stripe's own fees also apply. Rates and payment choices can vary. Read the terms before you connect.
Check that Stripe supports your country, device, and reader before choosing your payment setup.
Signing up
Open Stripe or Settings > Connect Stripe. Choose Connect and follow Stripe's sign-up steps. Have your business and bank details ready.
Complete the checks Stripe asks for. Return to M&M POS and check that the account is linked. Do not send bank details or passwords in a support message.
Connect an Account
Open Stripe > Connect Stripe. Sign in to your Stripe account and follow the approval steps. Return to the app and check the linked account.
Open Stripe Features to choose the tools you want. These include in-person payments, invoices, miscellaneous items, recurring payments, and Stripe products. Some tools need more setup.
Connect Terminals
Open Stripe > Connect Terminals. Choose a registered reader, or Register New Terminal. Pick the reader type and location, then follow the pairing steps shown.
For a Bluetooth Stripe reader, use M&M POS to connect it. Do not pair it in the phone's Bluetooth menu first. Keep the reader on while updates finish.
For a supported smart reader, enter its pairing code when asked. Use only the models marked supported for your device. Check the connected reader before taking a payment.
Tap to Pay
Tap to Pay lets a supported phone take contactless payments without a separate card reader. Use the M&M POS app on a supported iPhone or Android phone and connect your Stripe account first.
Open Stripe > Connect Terminals.
Choose Register New Terminal, or Register a new terminal if the list is empty.
Choose Tap to Pay, then Register.
Choose the Stripe location when asked and finish the device prompts.
Allow the requested permissions and turn on location services when asked. On Android, turn on NFC if the app asks.
Wait until the connection is ready before taking payment. Follow the payment prompts and wait for the result.
This needs a supported phone and Stripe account. It is not a desktop-browser payment option. If Tap to Pay is unavailable, contact Support to check your phone and account.
Launch M&M POS on an S700
Connecting an S700 for card payments and running M&M POS on its screen are different tasks. Connect links the reader for payments. Launch M&M POS starts setup for running the POS app on the S700 itself.
Use another M&M POS device with your Stripe account connected.
Open Stripe > Connect Terminals and find the registered S700.
Choose Launch M&M POS and wait for App Uploaded.
Restart the S700 when instructed to finish launching M&M POS.
This needs the terminal launch permission. If the launch option is missing or you see Launch App Permission Missing, contact Support before changing your Stripe account.
Stripe Features
In Stripe Features, choose the tools you want visible. You can also set the tax for Stripe products and choose an automatic fee.
Capture timing controls whether a card amount is taken now or first held for later capture. A hold is not a final paid amount. Use this only if you understand the payment rules and check status in Stripe.
Do not change a connected account ID unless Support has confirmed the need. Use Open Dashboard and Stripe Transactions to review payment records.
Process Payment
Add the items on Sell. Choose the Stripe payment option shown for your device. Follow the reader or card-entry steps. Check the amount before you confirm.
Wait for a clear payment result. Keep the app open while it finishes. Check Transactions if you are not sure it worked. Do not charge again just because a receipt did not arrive.
Terminal
Open Terminal with a supported Stripe reader connected. Enter the amount and choose Charge. Follow the reader steps and wait for Payment Complete.
Use Send Receipt afterward. In Terminal Settings, set the receipt item name, tax, and fee, then save. Check these before the next payment. Terminal mode is not the same as an item-by-item inventory sale.
Refunding Payments
Find the original sale in Transactions and choose Refund. Check the items or amount, then choose the Stripe refund option.
Wait for the result. Check the Stripe payment if the app reports an error. A card refund goes through the payment account; it is not the same as giving cash back.
Payments & cash
Tax Rates
Set tax rates and choose how tax is included in prices.
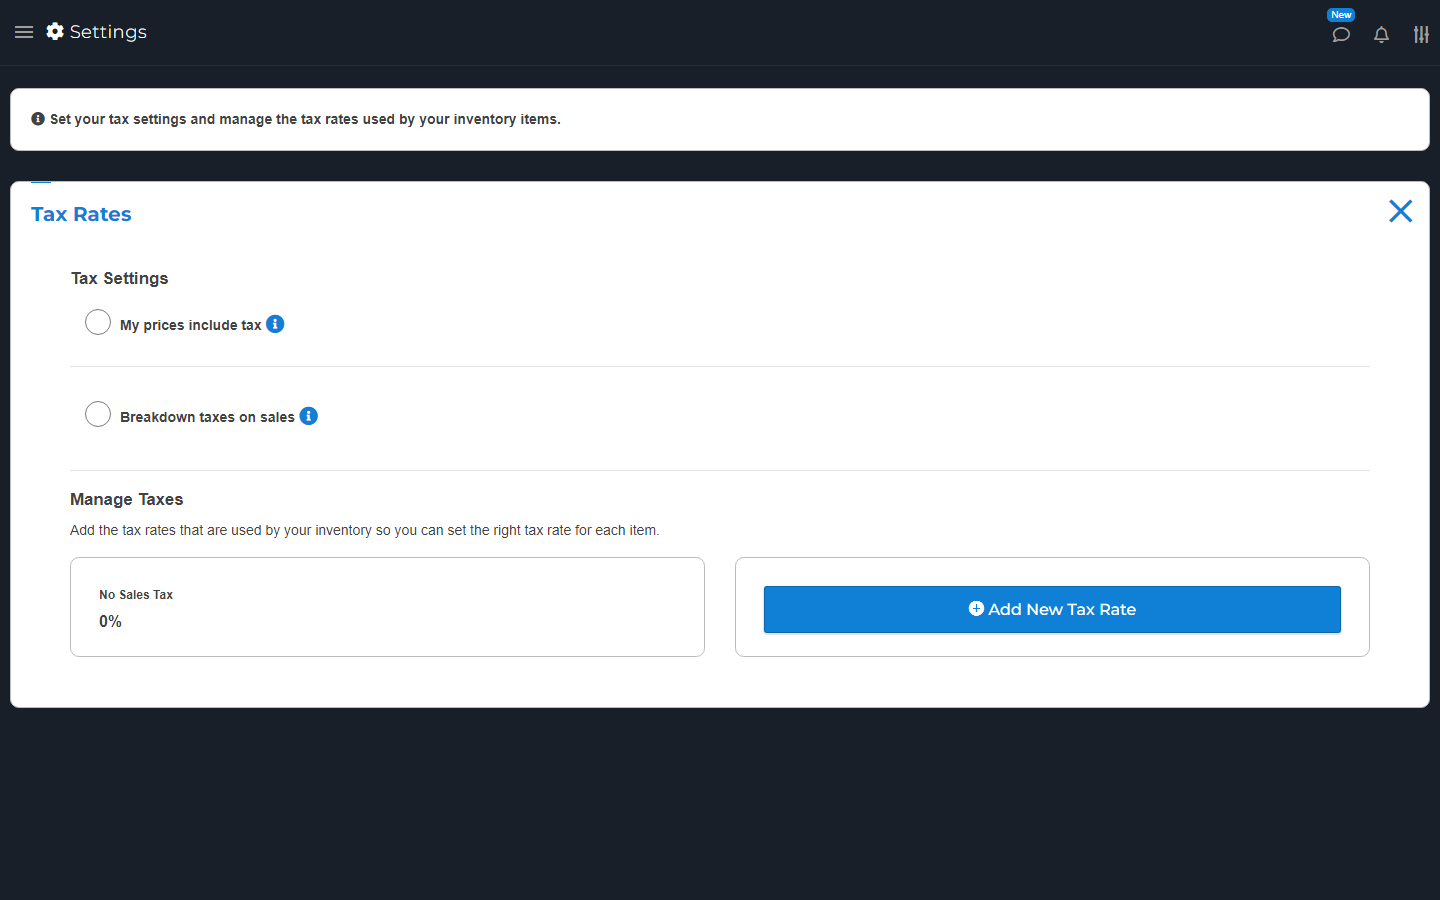
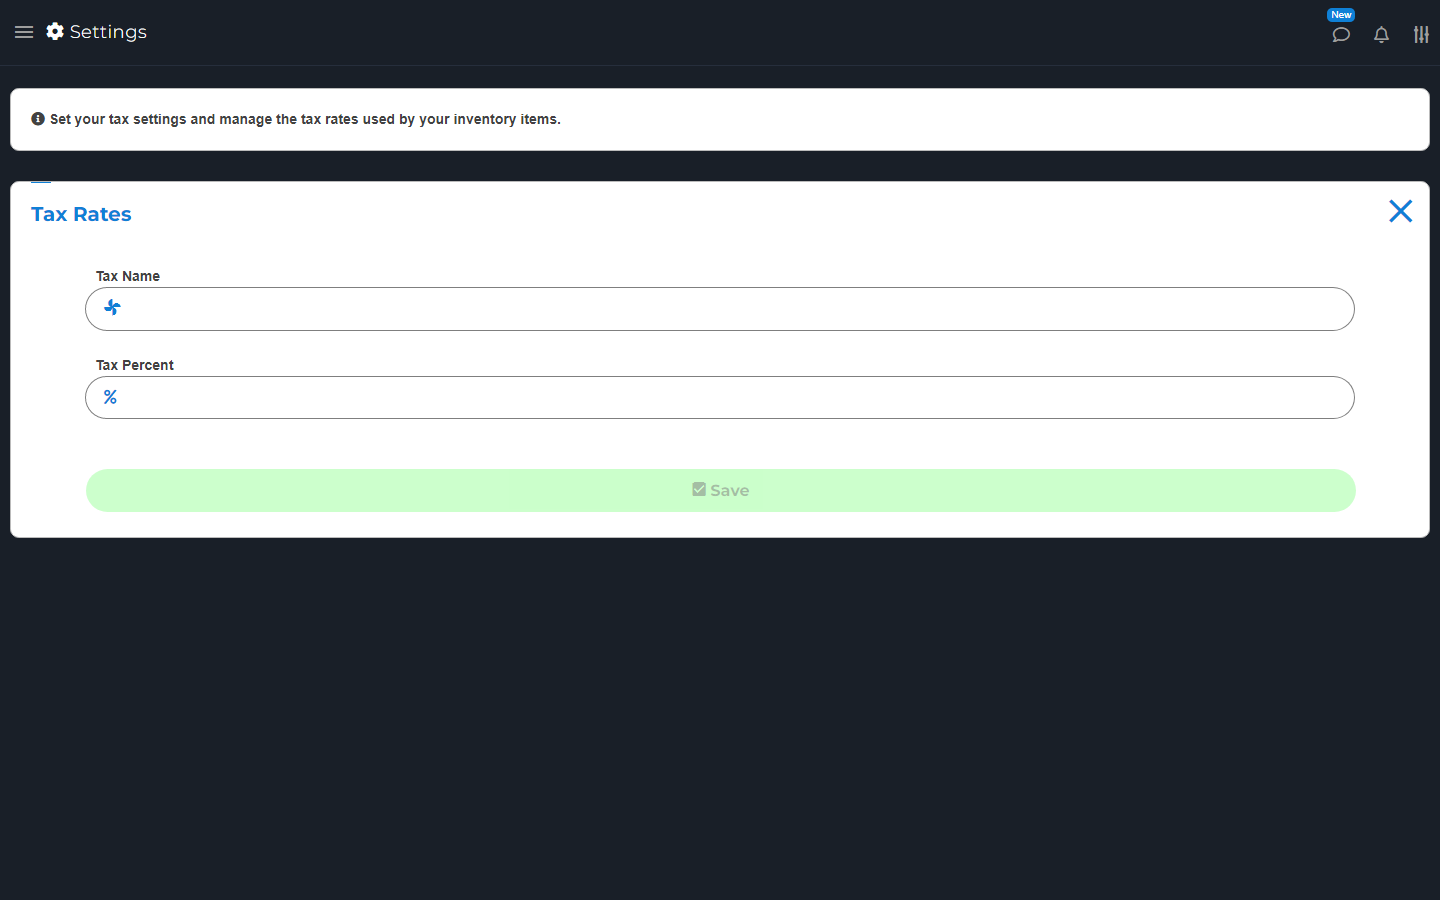
Open Settings > Tax Rates. Choose Add New Tax Rate. Enter Tax Name and Tax Percent, then choose Save. Set the correct rates on inventory items.
Editing a rate can affect all items using that tax profile. A profile is a saved tax rule. Check a cart and receipt after changing it. Ask your tax adviser which rates you must charge.
Add tax rates here, then choose the right rate for each item.
Give the tax rate a name and enter the rate that applies to your business.
My prices include tax
Open Settings > Tax Rates. Turn on My prices include tax only when the entered price already includes it.
Breakdown taxes on sales controls how taxes are shown. Check the item price and full cart total after a change. Do not turn this on just to hide a tax you are required to charge.
A fee is an extra charge, such as a delivery fee. Open Settings > Fees Management > Add New Fee.
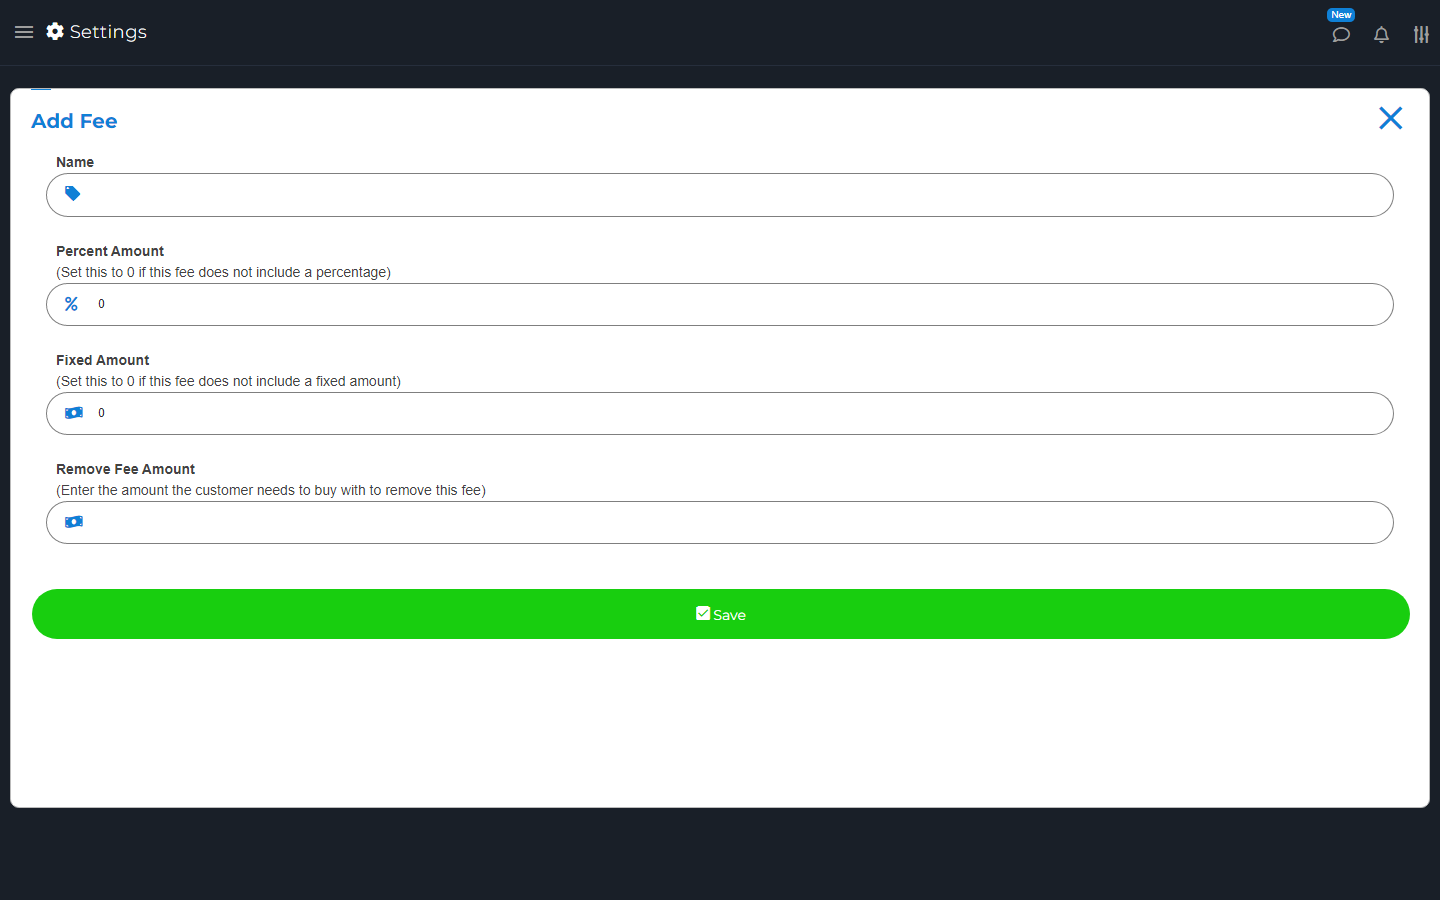
Enter its name and a fixed amount, percent, or both. Check whether it uses the subtotal or grand total. Subtotal is the item total before some added charges; grand total is the full amount.
Set Remove Fee Amount if the fee should go away at a set spend. Use Create As Assignee Tip? only for a fee meant as that worker's tip. Save and check a cart using it.
Set the fee name and amount here. Check the choices before saving.
Edit or Delete a Fee
Find the fee and choose Edit or Delete. Check where it is used, such as Sell defaults, order types, Stripe, or online checkout.
Save and check those settings again. Do not assume a change rewrites old receipts. Explain required fees to buyers before they pay.
Payments & cash
Control Register
Add-on
Set up a drawer, record cash movements, and check closing cash.
The cash-register tools can open a supported drawer for selected payment types. A drawer is the box that holds cash.
Opening it is not a sale or a refund. Cash tracking is a separate record of money going in and out.
Setup Register
Open Settings > Cash Register > Connect Register. Choose the supported printer or serial connection for this device.
Set which payment types should open it. Use Test Cash Register and check the result. Choose No Register On This Device on devices with no drawer.
Open Register
Use No Sale on Sell when you need to open the linked drawer without selling anything. An override PIN may be required.
Use the proper cash record when you take money out. Opening the drawer alone does not explain why cash moved.
Track Cash
Open Cash Register > Track Cash when available. Create a register, set the starting balance, and select its devices.
Check Logs for cash going in or out and drawer openings. Record Cash Out when money is removed. At closing, count the real cash and compare it with the recorded total.
Investigate any difference before closing the register.
A customer subscription is a charge that repeats. You might use it for a monthly service. It uses Stripe and is different from the M&M POS add-ons you buy.
Connect Stripe first. Open Stripe > Stripe Features and turn on Enable Recurring Subscriptions. Open Subscriptions > Add New Subscription Item. Enter Name, Price, Recurring Interval, and any Trial Days. Choose Save.
On Sell, choose the subscription and follow the signup steps. Explain the price, repeat payments, trial, and cancel rules to the customer before they agree.
View or Cancel Active Subscriptions
Open Subscriptions > View Active Subscriptions. Find the customer and check the plan, status, start date, and next bill.
Use View in Stripe to check payment details. Use Cancel and read the timing shown before confirming. Check the result in Stripe. Deleting a plan item is not a safe substitute for canceling an active customer's plan.
Customers
Customer Management
Add-on
Keep contact details and review customer activity.
The Customers list holds names, contact details, balances, and past activity.
Use the list to find a buyer and attach them to a sale. Keep private notes out of messages you send to customers.
Adding Customers
Open Customers > Add New Customer. Enter the name and any contact details you need. You can also add a custom ID and an internal note.
Check the email and phone number with the customer, then save. Set an account balance only when you mean to record money owed or credit.
Import Customers
Export a copy of your current list first. Open Customers > Import Customers and choose Download template.
Use that template's columns and order. Upload .xlsx, .txt, or .tsv. Check the preview and choose Import List only when it is right.
An existing custom ID can replace that customer's data. Check IDs, names, and contact details in the whole file before importing.
Editing Customers
Find the customer and choose Edit. Change the needed fields and save. Check for another record with the same person before making a new one.
A wrong phone number or email can send private receipts to the wrong person.
Verify Address
When an address search is shown, enter the address and choose the correct match. Check the street, town, and postal code.
Ask the customer to confirm it. Confirm that the address is within your delivery area before accepting a delivery.
Attach to Sale
On Sell, use Customer Search. Find and choose the person. Check the name above the cart before payment.
Use Detach customer if you picked the wrong person. The attached customer links the sale to their history and any eligible rewards.
View Details
Choose Details on the customer. Use the report list to view sales, estimates, invoices, orders, appointments, or rewards.
Check the selected date and filters. Use the receipt or document link to open a record. The account balance is separate from reward points.
Adding debt balance
Debt means money the customer still owes you. Attach the correct customer on Sell. Choose Customer Debt when the sale is meant to be paid later.
Check the current and new balance before you finish. This records an amount owed. It does not take money from a bank card.
Payoff Debt
On Sell, choose the customer and Pay Debt. Enter the amount they are paying and choose how they pay.
Finish the payment steps and check the new balance. Give a receipt. Use the payment steps to record what the customer paid, rather than only editing their balance.
Adding credit balance
Credit is money the customer can use at your store. Choose the correct customer and use Buy Credit or the credit action shown.
Enter the amount and finish the payment steps. Check the new balance. Record credit only when you intend to give it or have received the payment.
Use Credit
Attach a customer who has a credit balance on Sell. Choose Customer Credit. Check the credit used and the balance left.
Complete any other payment needed to pay the full sale. Store credit is not a bank card or reward points.
Rewards let buyers earn points, stars, or another name you choose. They can use enough points for an offer you set.
Reward points are not store credit or cash.
Set Up Customer Rewards
Open Settings > Customer Rewards.
Set the point name, icon, and color.
Set how much a buyer must spend to earn points.
Choose Add New Reward. Set its point cost and discount.
Choose whether it applies to the whole sale, chosen items, or categories.
Save the reward and Save Settings.
Attach the correct customer on Sell. Use Redeem to spend points on an offer they can use. Check the points and discount before payment. See How customers use online rewards for online use.
The customer portal is a web page where a customer can see their own records. It can show orders, receipts, invoices, estimates, appointments, and rewards.
What they see depends on your store's tools and settings. Your store login and their customer login are different.
Set Up Customer Portal
Open Settings > Customer Portal. Use Show customer phone number, Show customer email address, and Show customer address to choose the contact details customers can see.
Choose one of the profile-edit options: No changes allowed, Changes are allowed, or Changes are submitted for verification. The last option sends you a change request; you must review it and update the customer record yourself.
Check Allow customers to email you and Hide the shop link. In Customers > Details, use Send Customer Portal Link when needed. Check the recipient before sending a private link.
The Notify Customers tool uses Advertise > Message Subscribers. A subscriber is a person on your message list.
The app can add receipt recipients to this list. A receipt request is not consent to marketing. Only send marketing to people who agreed to receive it. Keep your list and opt-out requests up to date.
Add Subscribers
Open Advertise > Message Subscribers. Use Add Subscriber to add an email or a supported phone number. Check the address and the person's consent.
Search the list to find someone. Delete an address that should no longer get messages. Phone delivery depends on the country and carrier options shown.
Send Message
Enter a short message in Message Subscribers. Choose Generate Preview and check it. Check who will receive it before using the send action shown.
Do not include private customer details. Sending a message is different from saving a draft or making a preview.
With Employee Management, give each staff member their own name and PIN. A PIN is a short code used to sign in or approve an action.
Only give staff access to the pages they need. Do not share the store owner's login as a shortcut.
Adding employees
Open Employees. Before adding staff for the first time, choose Edit for Admin. Set a private Pin and Confirm Pin, then choose Save Basic Info. Keep the Admin PIN with the people who manage employee access.
Next choose Add New Employee. Enter their name, job title, and PIN. Confirm the PIN.
Choose Next and select the pages they may use. Choose Add Employee. Check their access before they work alone.
Editing Employees
Choose Edit on the staff member. Save name and PIN changes with Save Basic Info. Save page access with Save Permissions.
Permissions control which pages the person can use. Save each part you changed.
Clocking in
Clock in means start a work session. Pick your staff name and enter your PIN when asked. Use the clock controls to clock out when done.
Check that the right person is active before making a sale. Do not work under another person's name.
Recording transactions
Clock in with your own name before making sales. Check the staff name on saved sales in Transactions.
Use Employee Reports to review sales by person. For accurate staff reports, make sure each person uses their own sign-in.
A time sheet lists clock-in and clock-out times. It helps you check how long someone worked.
Check missing times before using the totals for pay.
View an Employee Timesheet
Open Employee Management and choose Timesheet for the person. Choose the week. Open a day to see its time cards and devices.
Use Add Clock-out only when you know the correct missing time. Export a copy if needed. Check the Auto Clock-out Timer setting so it fits your work rules.
An estimate is a price quote sent before the buyer agrees to the work. It is not a paid sale.
Use the Estimates tools to send it, see the buyer's answer, and take payment later.
Creating Estimates
Build the cart on Sell. Choose Estimate and give it a clear name. Check the items, price, and customer details.
Save and send it using the options shown. Check it in Estimates. Do not mark it paid just because it was sent.
View Estimates
Open Estimates. Search its name or use the status filter. Choose View to see the cart, customer, and answer.
Use Resend only after checking the recipient and the version you want them to receive.
Estimate Status
Waiting Approval means the buyer has not answered yet. Approved means they agreed to the quote. Rejected means they did not agree. A Paid label on an estimate is not enough to prove that money was received. It can appear when the estimate is turned into an invoice or order.
Approval is not payment. Open the linked sale, invoice, or order and check its payment result. Creating an invoice does not take payment.
Customer Online Form
The buyer opens the estimate link. They can review the items and total, enter their name and email, and choose Approve or Deny.
Tell them to check the quote before they answer. Their answer is not a card payment.
Pay Off Estimates
Open the estimate and choose Pay Off. Check the cart and choose the payment method. Finish the sale steps.
Check the estimate's status and the payment record afterward. Do not charge twice if the result is unclear.
Delete Estimates
Find the estimate and choose Delete. Read the message before confirming. Check whether it has been approved or paid first.
Connect your Stripe account to get this add-on for free.
An invoice is a bill that asks a customer to pay. Use it to list the items, amount, and due date.
A sent invoice is not a paid sale. Check its status and payment result before treating it as paid.
Creating Invoices
Build the cart on Sell and choose Invoice.
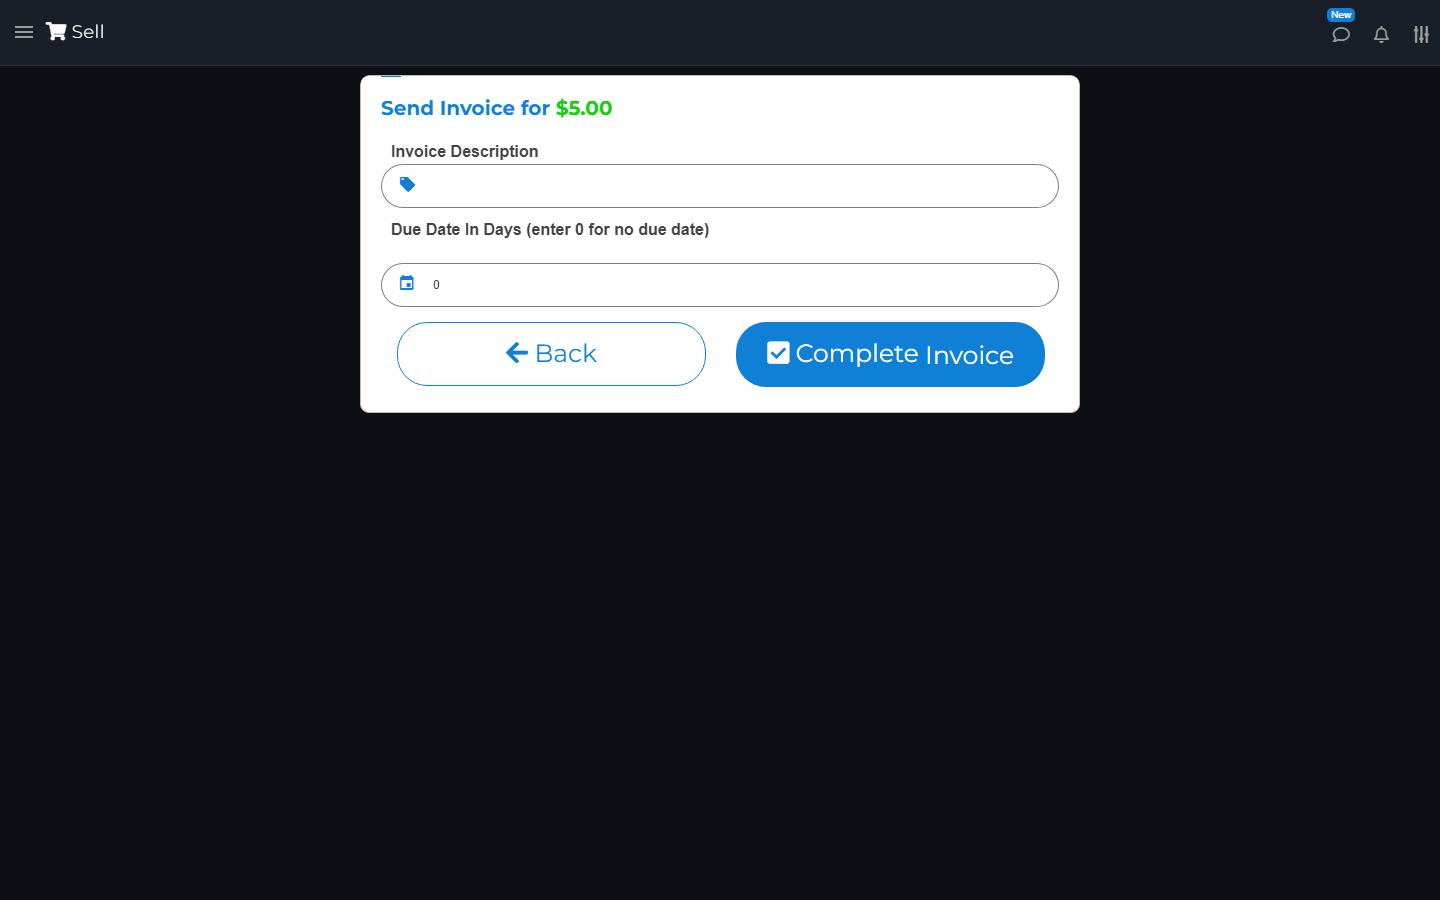
Enter Invoice Description and Due Date In Days. When the number of days is greater than zero, the form shows Customer Email, Late Fee, and Send Reminder Before Due By:. Enter a valid Customer Email when the number of days is greater than zero. Late Fee is optional. Choose the reminder timing you need under Send Reminder Before Due By:.
Check the items, amount, email, and due date shown in the form.
Choose Complete Invoice, or Complete on a smaller screen.
Open the saved invoice in Invoices. Check its number, amount, email, and date. Check the recipient before using the send options. Check the online copy too.
Creating an invoice does not take payment. If the saved or online due date is not what you expected, contact Support before asking the customer to pay. Check the due date on the saved invoice rather than relying on a blank or zero-day entry.
Enter an invoice description and check when payment is due before completing the invoice.
View Invoices
Open Invoices. Choose a date or range, then search or filter by Outstanding, Paid, or Past Due.
Outstanding means money is still due. Past Due means the due date has passed. Open the invoice to check its items, number, due date, and reminders.
Edit Invoices
Open the invoice and choose Edit. Change Invoice Description, Due Date In Days, Customer Email, Late Fee, or Send Reminder Before Due By: as needed. When Due Date In Days is greater than zero, a valid Customer Email is required. Late Fee is optional. Check the shown due date and choose Save Invoice. Reopen the invoice to check the saved result.
Customer Email is the reminder address on this form. It can differ from the email on the customer record. Do not assume that editing an invoice changes a card payment.
Online Payment
Send the invoice link to the correct customer. They open it, check the invoice, and use a payment option shown on the page.
Online card payment needs a supported linked payment account. The buyer should keep the page open until it finishes. If the result is unclear, check the invoice and payment account before asking them to pay again.
Pay Off Invoices
Open the invoice and choose Pay Off. Check the amount and choose how the customer pays. Finish the payment steps.
Reopen the invoice to check its status. Check the payment account for card payments. Do not mark an invoice paid only because the customer opened its link.
Get Signature on an Invoice
Open an invoice and use Get Signature when you need the customer's signature. Let them review the invoice first. A signature is not a payment.
Delete Invoices
Open the right invoice and choose Delete. Read the message and check its payment state before confirming.
Deletion is not a refund. Keep a copy of any invoice you need for your records.
An order keeps a cart you plan to finish or collect payment for later.
An order can be unpaid, partly paid, or paid. Its payment state is different from whether staff have made, packed, or handed over the order.
Creating Types
Open Orders > Manage Types. Add a name such as Pickup or Delivery. Set a fee if needed.
These POS order types are not the same as the online shop's checkout controls. Set online choices in Online Store > Checkout & Payments too.
Adding Orders
Build the cart on Sell. Add the customer, order type, date, and note when needed. Choose Order from the payment choices.
Check the details and save the order. Open it in Orders to confirm it is there. Saving an unpaid order does not take payment.
Editing Orders
Open Orders and select the order. Choose Edit to change its cart. Check existing payments before changing the total. Save and reopen the order.
You can also check its customer, assignee, type, note, and hand-off details. Resend the order only when the customer needs the updated copy.
View Payments
Open the order and review its total, amount paid, and balance. Use its receipt and linked sale records to check payments.
Use the Not Paid, Partial, and Paid filters to find open balances. Check the date range if an order is missing.
Make a Payment
Open the order and choose Pay Off. Check the amount still due. Enter the payment amount and choose its method.
Finish the payment steps. Reopen the order and check the paid total and remaining balance. An order can have more than one payment.
Pay for several orders
Use Pay off orders when you need to pay more than one order at once. Select only the orders you mean to pay.
Check their customers, balances, selected count, and total. Continue through the payment steps shown. Afterward, check each order's balance and the payment record.
Deleting Orders
Open the right order and choose Delete. Check its number and any payments before you confirm.
Do not use deletion to refund money or cancel a bank charge. Handle the payment separately through the right payment flow.
An assignee is the person you give work to, such as a driver. Assign Orders links orders to that person and helps settle the order balances and their commission.
A commission is the share or amount they earn. The settlement can be money the assignee owes the store or money the store owes the assignee. It is not always a worker payout.
Manage Assignees and Assigned Orders
Open Assign, open the three-dot menu, then choose Manage Assignees > Add New Assignee.
Enter the name and commission, then choose Save Assign.
Return to the assignee list. Choose Assign, select the correct orders, then choose Select.
To settle orders, choose Pay Off under the assignee. Select the orders and choose Pay Off again.
On Sell, check the order balances and Assignee Commission under fees. A positive total is money the assignee must pay the store. A negative total is money owed to the assignee.
Complete only the settlement you actually made. Check Paid Orders, the orders' balances, Transactions, and any commission expense afterward.
Schedule shows orders due on set dates. Use it to plan pickups, deliveries, and other order work.
This is separate from booking a service appointment.
Complete Scheduled Orders
Open Schedule and choose the date or order type. Open the order and check its items.
At hand-off, use the signature, note, and images if needed. Choose Save & Complete only when the work is done. View completed work to check the result.
Marking work done does not by itself prove that its balance was paid.
An Order Station is a screen for the team making or packing orders. It shows the items that belong at that station.
It is different from a Printer Station, which sends paper tickets to a printer.
Set Up Order Stations
Open Orders > Order Stations > Add New Station. Name the station and select its item collections. A collection is a group of items used by the station.
Set the card size and late-order time, then Save Station. Choose Launch. Open a card to view the order. Use Done when the station's work is finished. Check the completed view if needed.
A route lists a start point, stops, and an end point. Use it for drivers or staff who visit more than one place.
A route is not a live driver tracker or a promise of an arrival time.
Create and Share a Route
Open Routes > Add New Route. Name it, set the start and end, and add stops. Check each address. Add a note for the driver if needed.
Save the route. Use Maps to view directions or Share and Send to give the route to the right person. The shared page shows the stops and Open In Google Maps.
Do not put private notes on a route you plan to share with someone who should not see them.
Address Radius Search
If Address Radius Search appears while choosing a stop, enter a place and the mile range. A radius is how far out to search.
Choose Search, review the results, and select the correct address. Check its full address before saving the route. Confirm the address with the customer when needed.
A service is work you do for a customer, such as a haircut. Use Services to set it up and Calendar to book a time.
Online booking also needs the service and online checkout settings. Check the service's available times and online payment choices before inviting customers to book.
Adding Services
Open Services > Add New Service. Enter the name and price. Set the time it takes, if known. Add images if needed. The field called Internal note can appear as the shop's service description. Use text that is safe for customers to read.
Set rules for when it can be booked. Check whether more than one slot or overlapping bookings are allowed. Save the service. Check available times before you share it online.
Editing Services
Choose Edit on the service. Check its price, duration, pictures, and booking rules. Choose Save Service.
Check existing bookings separately. Do not assume a change moves all appointments already made.
Service Availability Rules
Edit a service and choose Add Availability Rules. Pick the dates, days, or times that the form supports. Check each rule's summary and note.
Set the service duration and whether multiple slots or overlapping bookings are allowed. Overlapping means more than one booking can use the same time.
Save, then check the available times in the calendar and shop. Do not promise a time that the booking page does not offer.
Online Service Appointments
Set up the service, its duration, images, and available times. With the Service Appointments add-on enabled, open Online Store > Checkout & Payments > Services.
Enable the supported payment choices. Stripe needs a linked account. The cash choice records a booking to pay in person; it is not an online card charge.
Open the service in the shop. Check its dates and available slots. The buyer picks a slot and continues to checkout. A listed service can say booking is not available if setup is incomplete.
Scheduling Appointments
Open the service's Schedule action or use Calendar > Add Appointment. Choose the service and date. Pick an available time and attach the customer.
Add a note if needed. Check the start and end, then Save Appointment. Send the appointment details if needed.
Filtering Appointments
In Calendar, choose the date or month and the service. Use Show Paid or Hide Paid to change the view.
If you cannot find a booking, clear the filters before creating a duplicate.
Search Appointments
Use Search Appointment # in Calendar. Enter the booking number and open the result. Check the service, customer, and date before making changes.
Editing Appointments
Find the appointment in Calendar and open its edit action. Change the date, time, customer, or note as needed. Pick a time the app allows and save.
Check the saved booking. Tell the customer about changes that affect them.
Pay off Appointments
Open the appointment or select it from Sell's Appointments list. Use the payment action shown. Check the service and amount, then finish payment.
Check that the booking is marked paid. Do not take payment again for a booking already paid online.
Deleting Appointments
Find the correct appointment and use its delete action. Read the message before confirming. Tell the customer if the booking is canceled.
Handle any refund separately. Removing the appointment is not proof that money was returned.
Deleting Services
Choose Delete for the service and read the message. Check its future appointments before confirming.
Deleting a service is not the same as contacting booked customers or refunding them.
To remove an event, choose Delete on the correct event and read the prompt. With ticket or check-in history, Cancel Event keeps that history. Without history, Delete Event permanently removes the event. Neither action refunds buyers. Use the original sale's refund steps and check the payment result separately. Stop door entry for a cancelled event; do not assume existing ticket codes or open gate screens have been revoked.
Set ticket prices and limits
Open the event's Tickets and choose Add Ticket Type. Enter its name, price, and description. Set its capacity, which means the most tickets you will sell. The form says to leave it blank for unlimited.
Set Sales Open, Sales Close, and whether the type is active. Choose Save Ticket. Check remaining tickets and sale dates before publishing the event.
A published event can still have no tickets for sale if its ticket types are inactive, sold out, or outside their sale dates.
Sell tickets at the counter
On Sell, choose Event Tickets. Pick the event and ticket types. Set the counts and choose Continue.
Enter the attendee details the event asks for. An attendee is the person coming to the event. Add tickets to the cart, check them, and take payment.
Open Events > Issued Tickets to review the ticket and its linked sale. Do not print or share a different person's ticket.
Check tickets at the door
Open the event's Open Gate, or use Start Gate Mode on Sell. Check the selected event.
Scan the ticket barcode, or search the attendee or ticket number. Read the result. Use Check-In for a valid waiting ticket. Do not admit someone on an invalid, refunded, or already-used ticket.
Use Walk-Up Sale for a new buyer at the door. Exit Gate Mode when you are done. Check the waiting and checked-in counts during the event.
What an online ticket buyer does
The buyer opens Events, chooses an event, and picks a ticket type and count. They enter the required attendee details and add the tickets to the cart.
Online tickets need a connected Stripe account and online payment. Ticket-only carts skip pickup, delivery, and shipping. A cart with goods and tickets still asks how to receive the goods and must be paid online.
They finish checkout and open the issued ticket. The ticket has a barcode. If shown, they can add it to Apple Wallet or Google Wallet, or print it.
The ticket page is not a way to buy a second ticket. Do not share one person's code with several people.
Open Online Store from the main menu, or Settings > Online Store. Open Storefront Appearance. Your Store Link is the address buyers use.
Copy the link or choose Open to view your shop. Use Claim your domain or Edit Store Link to choose the name offered by the app. Check and save it using the steps shown.
These controls set your shop link within M&M POS, rather than connecting an outside domain. After a change, use the new saved link and check your shared ads and links.
Storefront Appearance
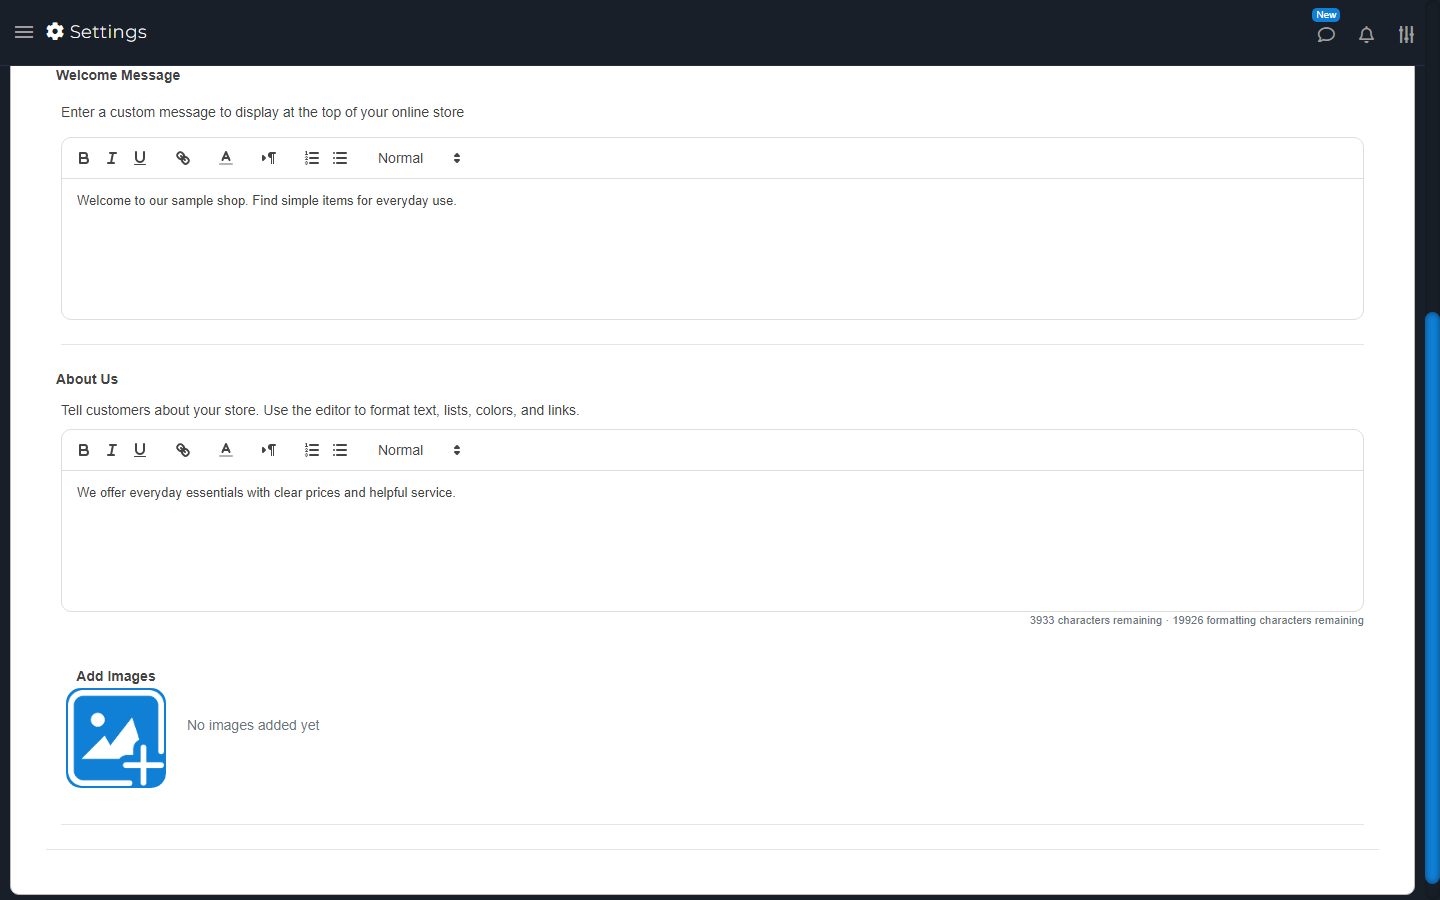
Open Online Store > Storefront Appearance. Add a wallpaper image and a welcome message. Use About Us to tell buyers about your store.
Write a welcome message and tell buyers about your store.
The About editor lets you format text and links. Keep the text within the limit shown. Add About images, move them left or right to set their order, or remove ones you no longer need.
Use clear text and your own photos. Let uploads and saves finish, then open the shop to check what buyers see. Business information holds other store details, such as the name and logo.
Products & Inventory
Open Inventory and edit an item.
Open its Online tab and turn on Add item to online store?.
Set Online Retail Price.
Write Online Description for the buyer. Add clear images.
Save, then use View Online Item or open the shop to check it.
The online price can differ from your in-store price. Set public online text and check the page. If online text is missing, the shop can use the item description. Set up product choices in Variations. Packages have their own online switch, price, text, and pictures.
Turn this on to show the item in your shop. Set its online price and details.
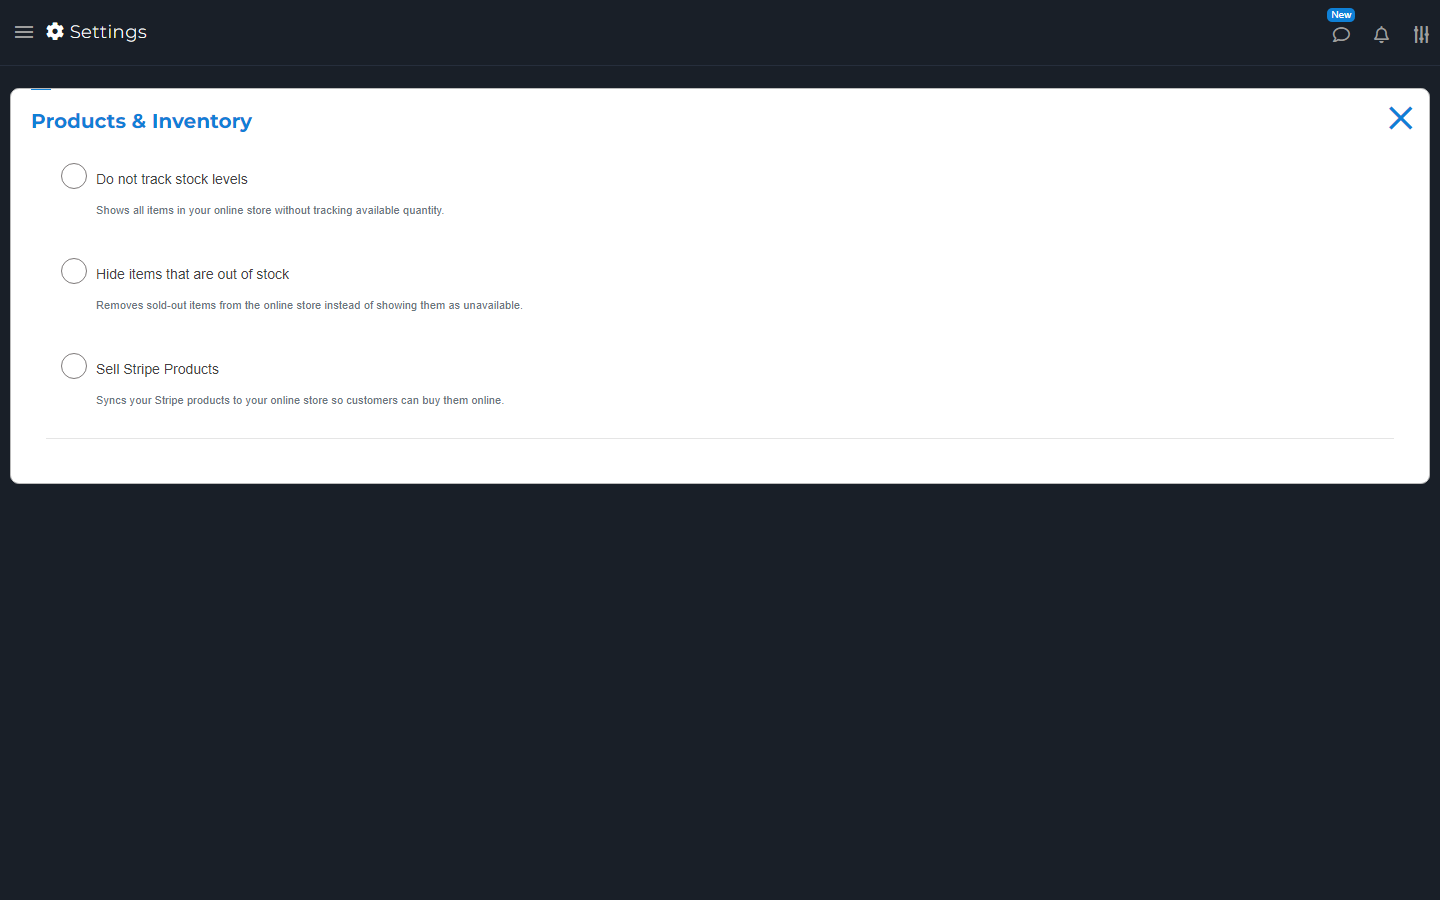
Do not track stock levels lets the shop sell without limiting items to the available count. Turn it off when stock should limit sales.
Hide items that are out of stock removes sold-out items from the shop list. With it off, an item can stay visible but be unavailable to buy.
Check both choices together. Check real item counts and package parts. Update item quantities in Inventory when new stock arrives.
Choose whether buyers can order items that are out of stock.
Sell Stripe Products
In Products & Inventory, use Sell Stripe Products if you want the linked Stripe product list in your shop. Connect Stripe first.
Check the products, prices, and tax choices before sharing them. Stripe products and your normal Inventory items are different lists. Do not assume a Stripe product has the same stock count as a POS item.
Checkout & Payments
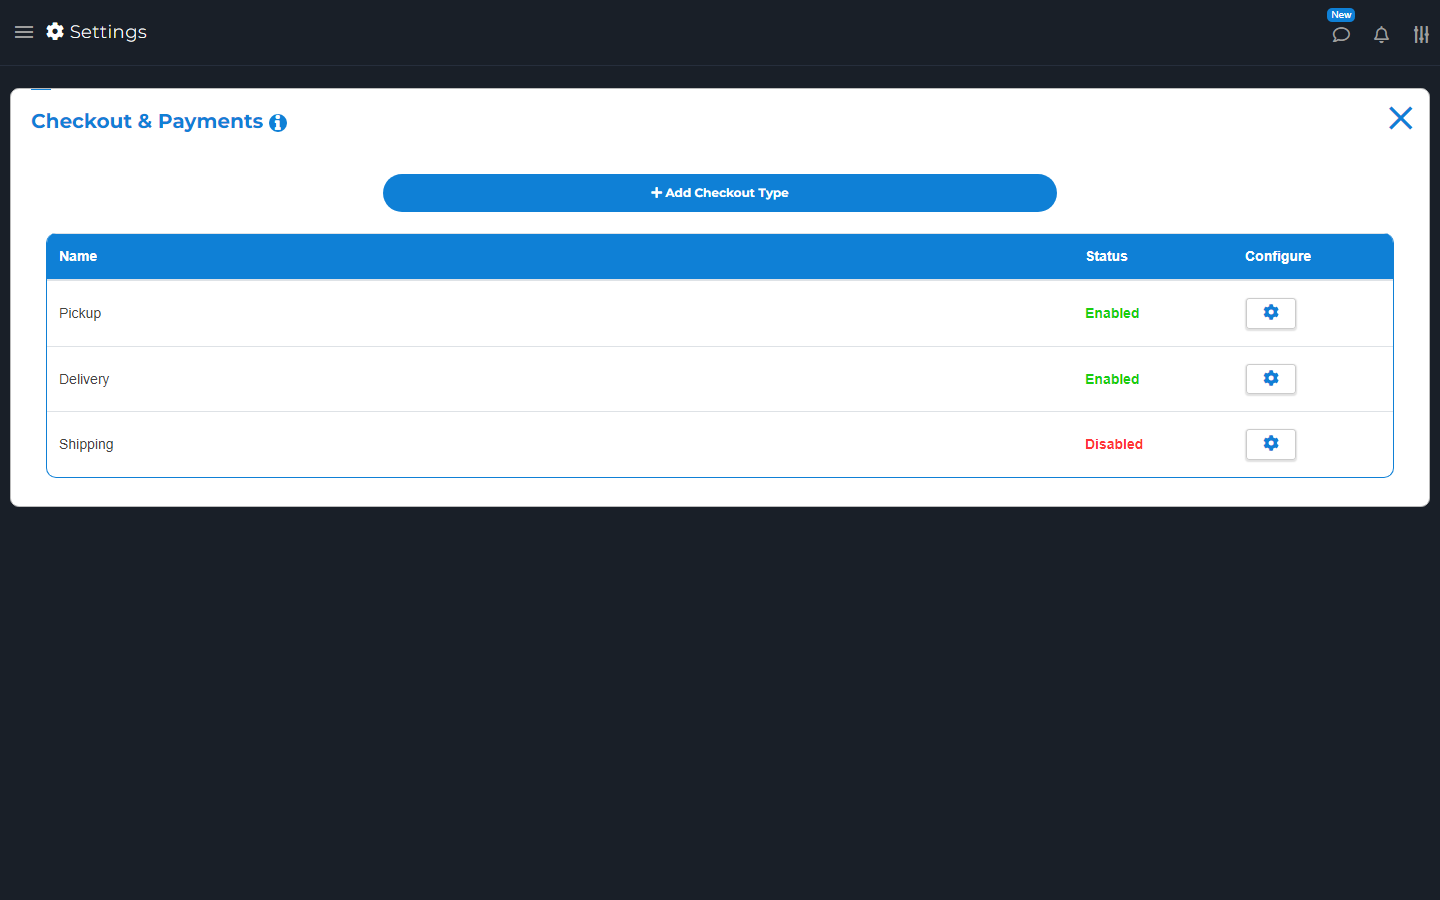
Open Online Store > Checkout & Payments. Open Configure for each type you plan to offer.
Pickup means the buyer collects it. Delivery means you take it to them. Shipping means you send it to their address. Services is for bookings with the Service Appointments add-on.
Turn on the type and choose at least one payment option it supports. Stripe needs a linked Stripe account. Pay-later choices for goods need the Orders Management add-on.
Check each type's fee, minimum spend, tips, notes, and address choices. Then open the shop and check the choices buyers see. Turning off all usable types stops checkout for orders that need pickup, delivery, or shipping; it does not hide every product. A cart with only event tickets skips these choices and needs online payment through a connected Stripe account. A cart with goods and tickets still needs a way to receive the goods and must be paid online.
Open a checkout type to choose how buyers receive and pay for orders.
Add Checkout Type
Choose Add Checkout Type. Enter a clear label and short description. Enable the payment choices offered for it. Set its minimum, fee, and any address or time choices.
Save and check it in the shop. A custom type does not add a new card processor. Connect Stripe for card payments and enable Orders Management for pay-in-person orders.
You can remove a custom type when no longer needed. Built-in types such as Pickup, Delivery, and Shipping keep their fixed roles. Turn them off rather than trying to turn them into a different type.
Configure a Checkout Type
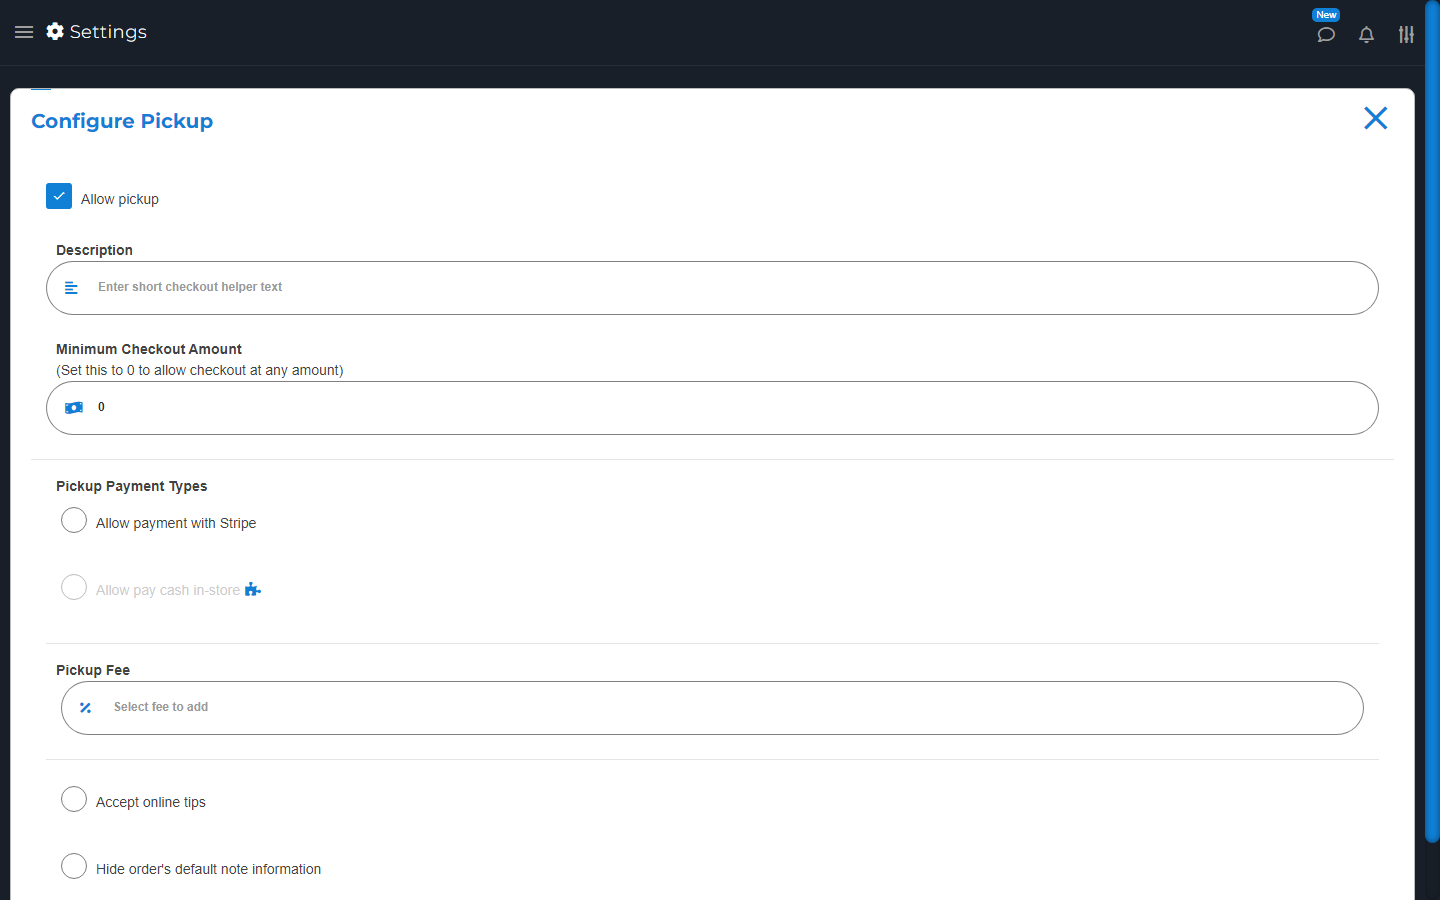
Configure a checkout type in Checkout & Payments. Set Minimum Checkout Amount to the smallest order you accept for that type. Zero removes that minimum.
Choose its fee if needed. Turn Accept online tips on only if you want the tip choice shown. Check Hide order's default note information before hiding text buyers might need.
Open checkout and check its final total. A minimum is a spending rule, not an extra fee. Different checkout types can have different rules.
Check the minimum order and payment choices for Pickup. Choose a payment method before taking online orders.
Ask for an address or order time
Delivery and Shipping need the right destination details. For a custom type or Services, use Ask for address fields if your work needs an address.
Use Show order time card for supported goods-order types after enabling online hours. Service bookings use service slots instead.
Check the customer form. Asking for an address does not set a delivery zone, book a courier, or buy postage.
Checkout Hours
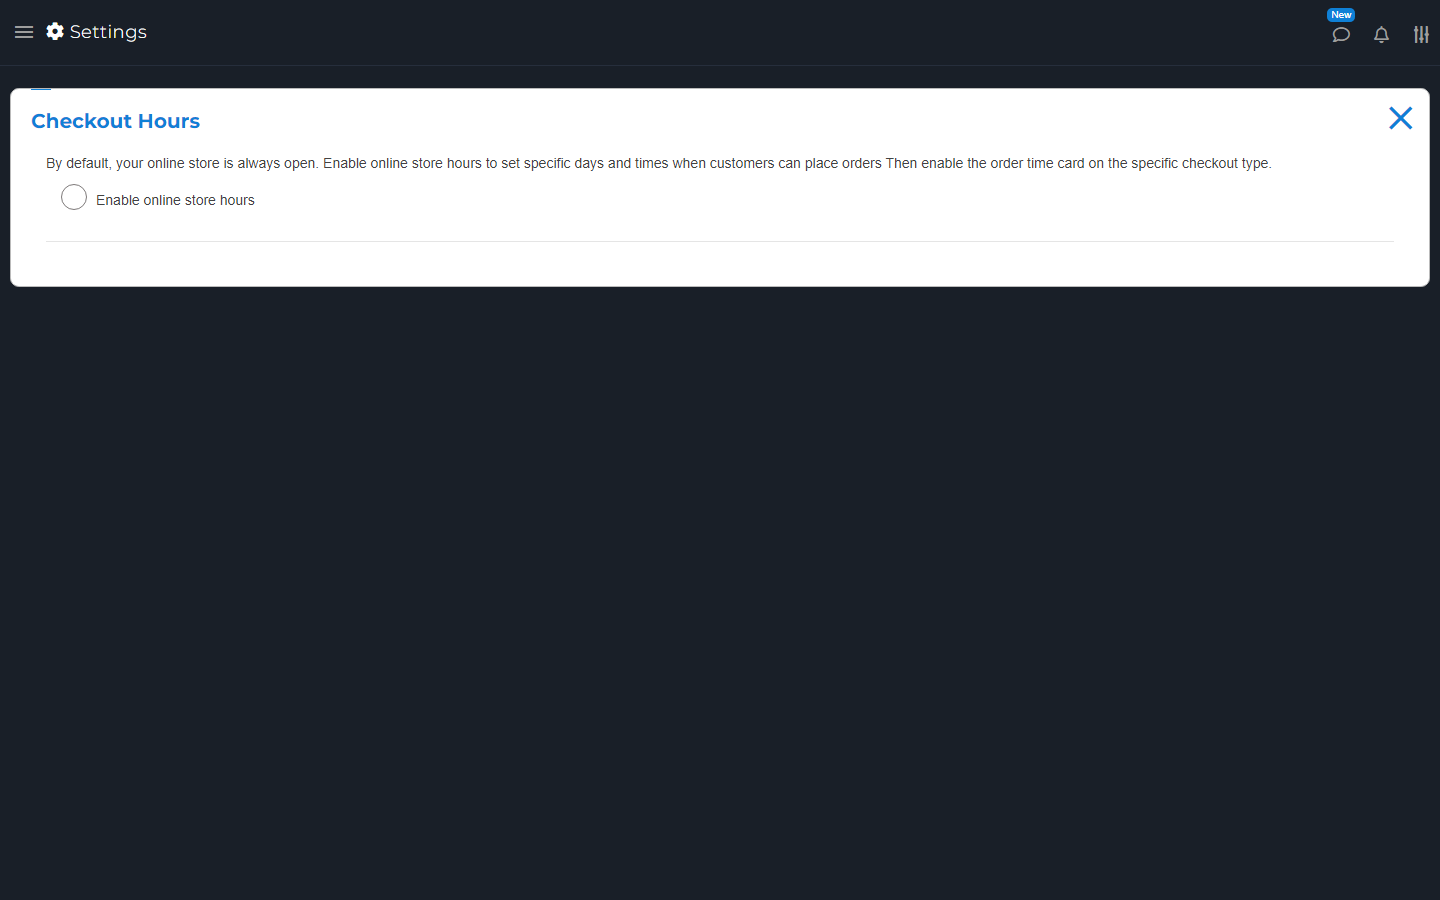
Open Online Store > Checkout Hours. Turn on Enable online store hours if you want to limit when orders can be placed. Set each open day and its times. Check closed days too.
Open each checkout type and turn on Show order time card where needed. Service bookings use their own available slots, not this goods-order time card.
Business hours shown on receipts are a separate setting. After a change, check the shop when open and when closed. Do not assume a visible product can always be ordered.
With store hours off, buyers can order at any time. Turn on Enable online store hours to add a schedule.
Order Notifications
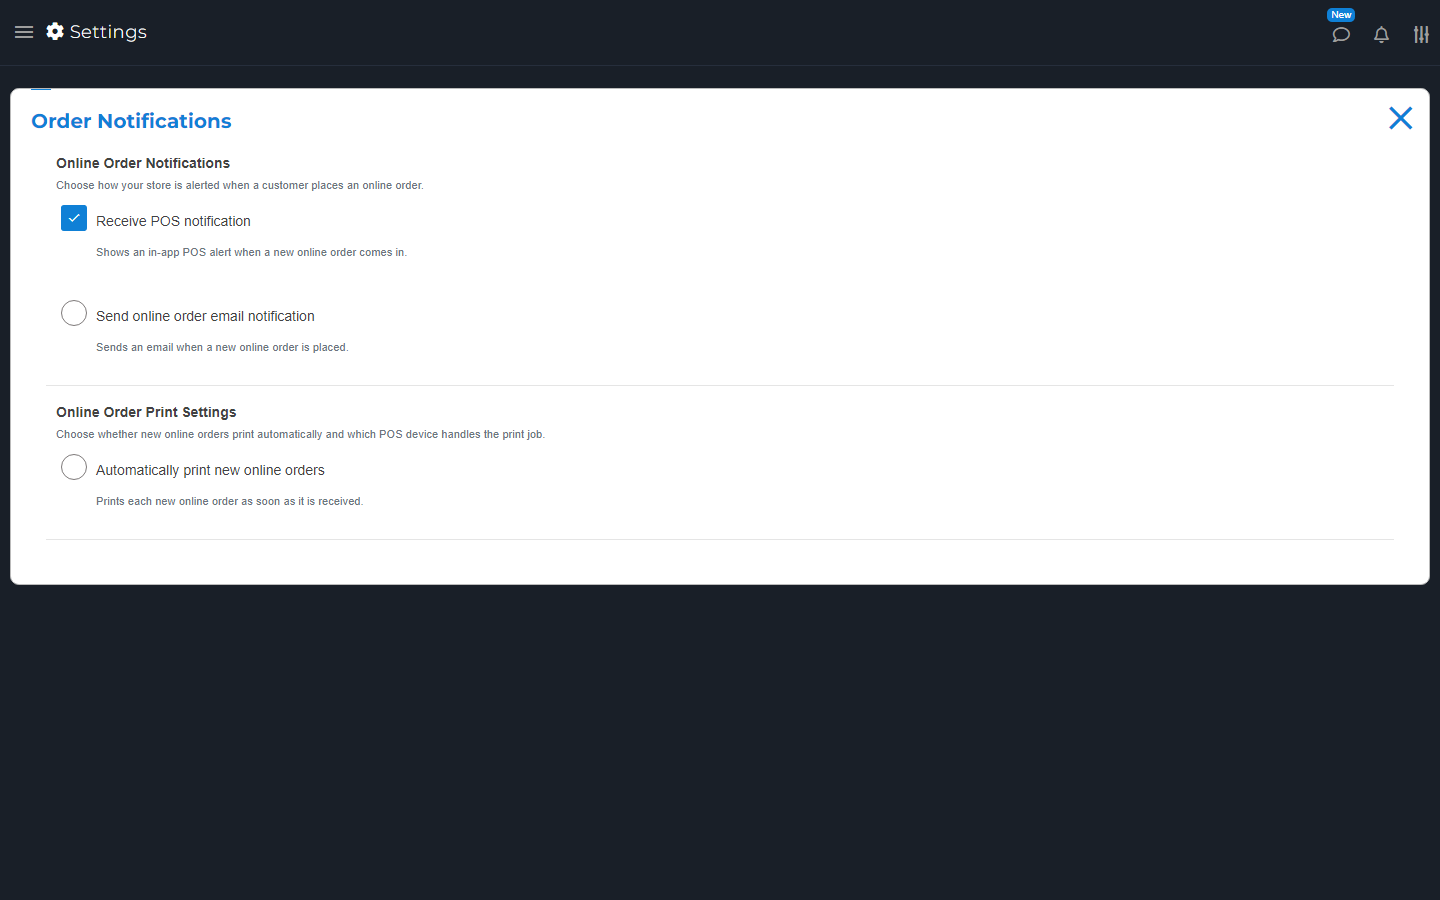
Open Online Store > Order Notifications.
Turn on Receive POS notification for an alert in the app.
Turn on email alerts if needed. Check Online Order Notification Email.
For paper orders, turn on Automatically print new online orders.
Pick the Online Order Print Device linked to the printer.
That device must be online when an order arrives. An email alert, a POS alert, and a printed ticket are separate things. Check the order and payment state before you make or hand it over.
Choose how the POS alerts you when a new online order arrives.
Check your shop before sharing it
Open your saved Store Link as a customer. Check the store name, logo, phone, policy, and hours.
Open products and check prices, choices, photos, and stock. Check packages, services, events, coupons, and rewards that you offer. Put an item in the cart and review checkout types, fees, address fields, and payment choices.
Do not make a real payment just to test the page. Use an agreed test process if you need a full payment test. Share the link only after the shop shows what you intend to sell.
Handle an order from the shop
Check the right place for each purchase:
Goods: open the alert or find the order in Orders.
Service bookings: check Services > Calendar.
Tickets only: check the sale in Transactions and the tickets in Events > Issued Tickets.
Goods and tickets together: find the order in Orders.
Check the customer, items, choices, type, address, time, and notes. A saved order, booking, or sale does not by itself prove payment. A pay-in-person order still needs payment. Use the linked sale and receipt to check a paid order.
Use your order station, schedule, or printer tools if enabled. Automatic online-order printing does not cover ticket-only sales. Check those tickets and their sale separately. When a payment result is unclear, check the payment account before charging again.
An item is missing or cannot be bought
Check the item in Inventory. Is Add item to online store? on? Is its online price set? Does its variation group point to the right items?
Check stock and Hide items that are out of stock. For a package, check its online switch and included items. Clear shop filters and open the saved Store Link again.
If it still looks wrong, send Support the item name and what you expected. Do not make a second item just to hide the problem.
The shop will not take orders
For goods that need pickup, delivery, or shipping, check that at least one checkout type is enabled with a usable payment option. Check online hours, minimum spend, item stock, and required product choices.
For services, check available slots. For events, check publication, ticket dates, remaining tickets, and the connected Stripe account. Online tickets need online payment, including when the cart also contains goods.
If the whole shop shows Coming soon, use Support to check its availability. Do not treat a failed or spinning payment screen as a successful order.
Online shop
How customers use your shop
Follow the buyer's steps, from finding an item to checking an order.
Customers open your Store Link and choose Shop. They can search, pick a category or subcategory, or use Show only in stock. The Packages choice shows bundles when you sell them.
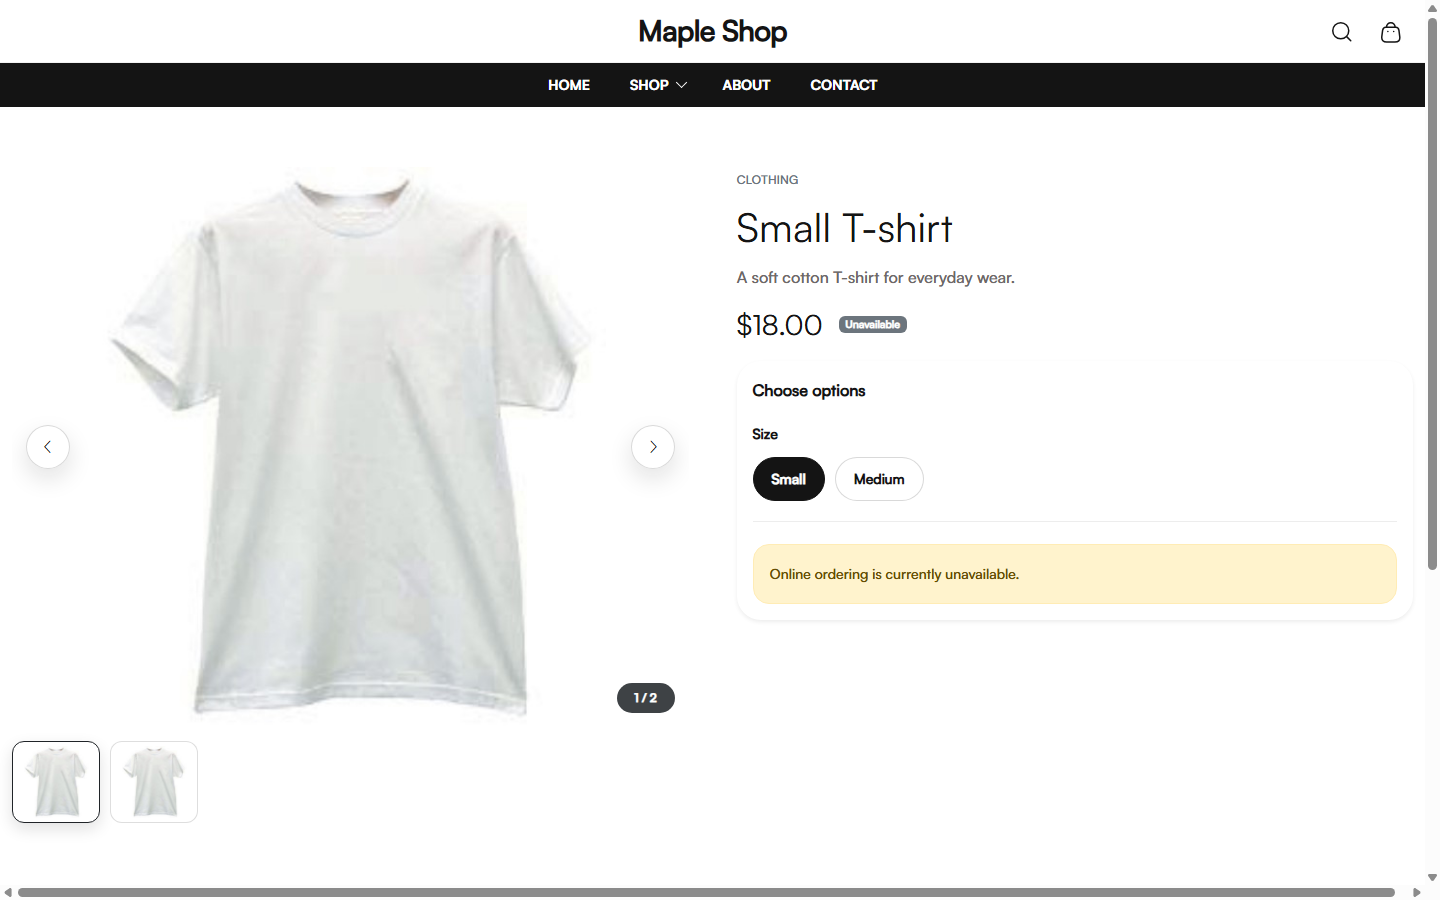
They open an item to see its details. Choose options means they need to make a choice, such as size, before adding it. Use clear item names and photos to help them find the right thing.
How customers choose an item
On the product page, the buyer checks the photos, price, and text. They choose the size, color, or other options shown. They choose any required modifiers and enter any special instructions.
Buyers can choose a size here. This sample shop is not taking orders. Sample T-shirt photo: GlennD09, CC BY 2.0.
Then they set the count and choose Add to Cart. The selected item can have a different price or stock than another choice. The buyer should check the cart before paying.
How customers check their cart
The buyer opens Cart to review items, counts, choices, and totals. They change or remove items there before Continue to checkout.
A cart is not a placed order. Stock, offers, and prices may be checked again during checkout. The final checkout total is the amount to review before paying.
How customers use online offers
Add-on
Customers open Offers to read the coupons you chose to show online. They check the dates, required items, and minimum spend.
They copy the code or use a shown Clip or Use at checkout button. In checkout, they apply the code and check the discount before paying.
A displayed offer is not a promise that every cart qualifies. Set the coupon's rules and online visibility in the POS Coupons page.
How customers use online rewards
Add-on
Customers can open Rewards to read how points are earned and what they can get. The names can be points, stars, or the name you set.
In checkout, they use the reward-member step shown. They may need a code sent to their contact details to prove the account is theirs. They pick an eligible reward and check the discount.
They need enough points and the right cart. They can also view reward activity in their account. Set the rules in Customer Rewards in the POS.
How customers place an order
Open the cart and choose Continue to checkout.
In Information, enter the required name and contact details.
For goods, choose how to receive them under Order method or Receive your items. Enter the address, time, or notes requested. A cart with only event tickets skips this step and goes to payment.
In Payment, choose an offered method. Add an eligible coupon or reward if wanted. Check any tip.
Review items, fees, tax, and the full total.
Choose Place order once and wait for the result.
For a goods order with a pay-in-person option, the buyer pays you later. Tickets must be paid online, even when the cart also contains goods. For online payment, they must finish the payment steps. Apple Pay or Google Pay only appears when supported by the device, browser, and payment setup.
What happens after checkout
The buyer should keep the page open while it says the order is being finished. After success, they can review the order details or receipt shown.
If the result is unclear, they should contact your store before trying again. You should check the order and payment account. A bank charge, order record, and confirmation page must be checked together when something goes wrong.
How customers sign in
Add-on
The buyer chooses Sign in or Account in your shop. They choose Email or Phone, enter their own details, and choose Send code.
They enter the received code and choose Sign in. Use a different email or phone lets them correct the contact choice. They should not share the code.
A buyer should use the contact details on their customer record to find their activity. If records are missing, check for a wrong or duplicate customer record. Never give them your store's owner login.
What customers see in their account
The account can show a dashboard, Orders, Purchases, Estimates, Invoices, Appointments, Rewards, and Profile. Available pages depend on the store's setup.
The buyer opens a record to see its details or receipt. Orders and Purchases are not the same list: an order can still be unpaid.
Customers should Sign out on a shared device. Store owners can review the matching records in Customers and the POS record pages.
How customers change their details
The buyer opens Account > Profile. They edit only the fields your store allows, then choose Update Profile.
If the page says changes need review, they are sending you a request. The customer record stays unchanged until you review and apply the request. If edits are off, they must contact you.
Set these rules in Settings > Customer Portal. Check requests and update the correct customer record when review is required.
How customers book a service
Add-on
Customers open Services, choose a service, and read its price and length. They choose a date or date range and an available time, then add a note if needed.
They choose Continue to Checkout and finish the booking and payment steps. A slot shown before checkout is not proof of a completed booking. Check the saved appointment in the POS.
If no times are offered, check the service's hours, length, rules, and existing bookings.
How customers buy tickets
Add-on
Customers open Events and choose an event. They check its place, date, time zone, and ticket rules. They choose ticket types and enter the required attendee details.
They add tickets to the cart and finish checkout. See What an online ticket buyer does for the ticket page and wallet options. Old event pages can stay visible even when tickets can no longer be bought.
About and contact pages
The About Us page uses the text and images set in Online Store > Storefront Appearance. Check that photos and links work.
The Contact page shows the store's contact details and map when set. The customer enters a name, email, and a message of at least 30 characters. The form does not allow links in the message.
Messages go to the store's Receipt Email when set, otherwise its store email. This is not the same as the Online Order Notification Email. Check both addresses in the right settings.
Rules and hours buyers see
Customers use Policies to read your store rules. The page separates your rules from platform website policies. Set your store rules in Business Information.
Business hours can appear on the shop. Online order hours can stop checkout outside your chosen times. Service times control booking slots. Keep these separate sets of hours in agreement with how you work.
How customers join your message list
If your shop shows an email signup form, customers can enter their own email to hear from your store. They should read what they are signing up for and wait for the result.
Manage the list with the Notify Customers add-on. Only send ads with the person's consent. A receipt email and a request for marketing are not the same thing.
Open the shop like an app
A supported browser may let a customer add the shop to their home screen. They can use the browser's install or Add to Home Screen choice when offered.
The shortcut opens your shop. It is a shortcut to the online shop, so checkout still needs an internet connection. Customers still need to complete the normal order steps.
Help a customer who is stuck
Ask what page they are on and read the error they see. Check the item, offer, hours, and order rules that apply to that step.
For a payment, check whether it already went through before asking them to retry. For sign-in, check their contact details without asking for their code.
Use Support in the POS when you need M&M POS help. The shop's Contact form sends a message to your store, not to M&M POS support.
Reports group your saved sales, refunds, expenses, and item costs.
Pick the right report and dates. Report totals depend on your saved records and item costs. Compare payment totals with your payment account or bank records when reconciling.
Sales Reports
Open Reports > Sales Report. Choose a day or range. Use time choices if shown. Review sales, refunds, expenses, fees, tax, and totals.
Profit is what is left after the costs counted in that report. Check missing item costs before relying on profit. Export the report if you need a copy.
A recurring expense repeats on a schedule, such as monthly rent. The app makes expense records from your rule.
These records do not send payments from your bank.
Set Recurring Expense
Add an expense and choose Set Recurring Expense. Pick Daily, Weekly, Monthly, or Yearly. Check the amount and start details, then save.
Open Recurring Expenses to check the next date or change the rule. Stop the rule when the cost ends. Review new expense records to avoid counting the same bill twice.
Reports & records
Exporting
Export copies of records or share the right document link.
Export means make a file or copy from your records. An exported file contains the records available when you create it. Export again when you need an updated copy.
Check the dates and filters before exporting. Keep files with customer or staff details private.
Export Inventory
Add-on
Add-on: Export Inventory.
Open Inventory's menu and choose Export Inventory. Pick a format shown. Save the file and open it to check the items.
For a later import, use the current Download template. Do not assume every exported column can be imported without changes.
Export Transactions
Add-on
Add-on: Export Transactions.
Open Transactions > Export Transactions. Choose a quick date range or set the start and end. Check the dates, then pick an export format.
Open the result and check the receipt numbers and totals. Keep records you need before deleting anything.
Export Expenses
Add-on
Add-on: Export Expenses.
Open Expenses > Export Expenses. Check the chosen dates and filters. Pick the output you need and check the saved copy.
Open the Customers menu and choose Export Customers. Save it in a safe place. Check that it contains the records you need.
Do not post this file in a public chat or share it with people who should not see customer details.
Export Reports
Add-on
Add-on: Export Reports.
This add-on also needs Sale Reports enabled for your store.
Build the report with the correct type and dates. Choose Export Reports, then one of the outputs shown.
Check the copy's dates and totals before sending it to anyone.
Shared Receipts, Invoices and Other Documents
A shared document link can open a receipt, order, estimate, invoice, appointment, purchase order, route, coupon, or ticket. The actions depend on the document.
A buyer can review and print a receipt. They can answer an estimate or pay an eligible invoice. A vendor purchase order and a driver's route are for different recipients.
Check the person before sharing. Treat a link with private details like the document itself. Do not post it on your public shop page.
A file attachment is a photo or document kept with a record.
Only attach files that belong with the record. Attachments can appear on shared online documents. Keep passwords and other private information out of files you plan to share.
Add and Check Attachments
Use Attachments on the supported sale or order screen. Pick the file and wait for its upload to finish. Stay within the upload size shown.
Check the file name and preview. Save the sale or order, then reopen it to check the file. Use Delete to remove a wrong file before sharing the record.
Open Settings > Receipt Printer and use the printer choices shown for your device. Add the supported printer type and give it a clear name.
A network printer needs its correct address and port. A USB or serial printer needs the right local connection. A Bluetooth printer must be on and nearby; use the paired-device list or scan option shown.
Save the printer, select it for receipts, and test one receipt. Check paper size and print quality. See Choose a printer connection for more detail.
Open Receipt Printer to choose the default printer and receipt options.
Choose a printer connection
Use only the choices shown for your device. For Network Printer, enter the printer's address and port. Both must match the printer setup.
For Bluetooth, turn the printer on. Use Show Paired Devices or Scan For New Devices, choose it, and save. This printer flow is different from Stripe Bluetooth readers, which must be linked through M&M POS.
For USB or ESC/POS, choose the supported connection. ESC/POS is a printer command format. A serial port is a computer connection name. Ask Support if you do not know the correct choice.
Set receipt size and print style
In the printer chooser, set Receipt paper width size to match the paper. The size is in millimeters. Set the text size and print-as-image choice only where offered.
Print one sample and scan any code on it. A cut-off receipt or unreadable code needs a setting or printer check before use.
Select Printer lets you choose a printer and change print options. The choices depend on your device.
Barcode Scanners
Connect a supported scanner to your device. On Sell or Inventory, put the cursor in the barcode field and scan one item.
Check that the full code appears and the right item is found. Some phones can use the camera scan button instead. A scanner is not a card-payment reader.
Scales
Use a supported scale and set the correct weight unit in Scale Settings. Check a known weight before selling.
If a device has no linked scale, use the manual-weight option. See Scalable Items for item setup and sales.
Deli CAS Scale Labels
Some scale labels include the item code and price. The label format must match what M&M POS expects.
Set Scale Barcode Price Digit Position with help from the setup guide or Support. Test a label and compare its item and total with the scale's printed label. Do not guess the format for a different scale model.
Cash Registers
A cash drawer often plugs into a receipt printer. The app sends an open command through that connection when supported.
Open Settings > Cash Register to set it up. Check the cable and printer with Support if the drawer does not open. A drawer connection is separate from tracking cash totals.
USB Magnetic Card Reader
A basic USB swipe reader can enter a stored code on supported screens. It is not automatically a secure payment terminal.
Use a supported payment reader and payment account for card charges. Do not copy full card details into text fields, notes, or messages.
A Printer Station sends selected items to a chosen printer, such as a kitchen printer. It uses item collections to decide which items belong there.
This is different from an on-screen Order Station.
Set Up Printer Stations
Open Settings > Printer Stations > Add New Station. Name it, choose its printer, and select the item collections.
Choose auto-print and the receipt details to show or hide. Save the station. Check that items reach the intended printer using your normal test process before using the station during service. Online auto-print also needs the chosen POS device to be online.
Open Settings > Business Information. Check the store name, phone, receipt email, website, and address. Add your logo and VAT number if needed. VAT stands for value-added tax.
Choose Save. Open a receipt and your shop to check the public details. Store ID is the number used to identify your store when getting help; it is not a password.
Store Policy and Store Hours
Open Business Information. Add your Store Policy and Store Hours, then save. A policy explains your store's rules, such as returns.
Check a receipt and the shop's policy and hours pages. Online ordering hours are set separately under Online Store > Checkout Hours. Service booking times have their own rules too.
Account Emails
Open Settings > Account Emails. Use Add Additional Email to add another store login. Enter the email and required password, then save. Follow the email check shown.
Use Set Main Account only for the email you want as the main login. Check carefully before deleting an email. Keep access to the main email, especially for password resets and billing.
Deactivate M&M POS Account is not a normal sign-out button. Read its warnings and contact Support before closing a store you still need.
Change this device's choices
Use the app's device options for settings such as sound, display, or the connections offered on that device. Check the device name first.
A mobile device and desktop may show different choices. For the app version and update action, open Settings > App Information.
Store Connector lets you connect store accounts and switch between them. Each store still has its own identity.
Check the store name before changing stock, taking a payment, or sending a message.
Connecting Accounts
Open Store Connector > Connect Account. Enter the other store's login details and choose Connect. Use only accounts you are allowed to manage.
Keep the password private. Check that the correct store appears in the list.
Switching Accounts
Open Store Connector and choose Switch for the store you need. Check its name before doing work.
Use the return option to go back to your main store. Do not assume a setting change belongs to your usual store after switching.
Disconnecting Accounts
Open Store Connector and choose Disconnect for the correct account. Read the message and check any data-sharing setup before confirming.
Disconnecting removes the link between stores. It does not delete the other store's account.
Share items or customers between stores
Open Share Data for the connected account. Read what will be shared before turning it on.
Shared inventory can include taxes, vendors, packages, units, and modifiers. It uses a central store for management. Shared customers can include balances and rewards used across locations.
Check the direction and stores before Save data sharing. Turning on data sharing changes which records the stores use. Ask Support if you are not sure which store should own the shared list.
Store tools & settings
Chat
Use Chat to ask about your store and work with its records.
Chat is included with M&M POS. No add-on is needed. Open Chat to ask about your store. Type a clear request and choose Send. Use the paperclip for a file when needed.
A request can lead to a store action. Say what you want changed and check the result in the app. Do not send passwords or full card details.
If a message fails, use Retry on that message. If Chat is unavailable, use its Retry button or send a Support Ticket. Check that the requested change appears in the app before relying on it.
Files and voice messages in Chat
Use the paperclip to choose a file. Check its name before sending. Tap the microphone to record a voice message. Use the trash button to discard it, or Send to stop and send the recording.
A voice message is sent as a recording. Download a returned report while its link is still valid. The chat shows a 48-hour limit for those report links.
Check reports and suggested changes before relying on them.
Help & support
Support
Get help from the M&M POS team, report a problem, or send feedback.
Open your store-name menu and choose Support. You can read the manual or send a Support Ticket.
Tell us what you tried and what happened. Do not include passwords, login codes, or full card details.
Submitting a Ticket
Open Support > Submit New Ticket.
Choose the type, such as Bug, Feature, Feedback, or Question.
Write what you need help with. For a problem, include the page, steps, and error text.
Choose Submit Ticket and check Submitted Tickets.
A bug is something that did not work as expected. A feature request asks for a new tool. Include your device type if it helps explain the problem.
Choose the ticket type and describe what you need help with.
Give feedback about the app
Use Support to report a problem or ask for a tool. If a rating or share screen appears, use it only if you want to.
Submit Feedback sends the feedback through the offered form. Share can open an outside app, so check the message and recipient before sending. For an unresolved problem, use a Support Ticket so our team can help.
Request a custom feature or integration
Need a custom feature or integration? Our team would be happy to help. Tell us what you need and how it would help your store. We will review your request and discuss the next steps with you. Contact our team.
Help & support
Still need help?
Friendly help, answers, and ideas for your business.
Whether you are setting up your store or using M&M POS every day, our team would be happy to help. Ask a question, get help with a feature, or tell us about a problem.
We will take the time to understand what you need and explain the next steps in plain words.
Get help with your store setup, items, and online shop.
Find out how to use a feature for your daily work.